uCore进程及进程管理
uCore:进程及进程管理
我们将开发一个用户 终端 (Terminal) 或 命令行 (Command Line Application, 俗称 Shell ) , 形成用户与操作系统进行交互的命令行界面 (Command Line Interface)。
为此,我们要对任务建立新的抽象: 进程 ,并实现若干基于 进程 的强大系统调用。
flowchart LR
    subgraph init["初始化阶段:无用户任务"]
        direction LR
        registers_0("registers.cx: idle运行状态"):::pink
        current_0("current: None"):::purple
        idle_task_cx_0("idle_task_cx: zero.ctx(占位)"):::green
    end

    subgraph stage_1["阶段1:fetch_task"]
        direction LR
        registers_1("registers.cx: task.cx(用户任务状态)"):::pink
        current_1("current: Some(task)"):::purple
        idle_task_cx_1("idle_task_cx: 原registers.cx(idle休眠状态)"):::green
    end

    subgraph stage_2["阶段2:suspend"]
        direction LR
        registers_2("registers.cx: idle运行状态(从idle_task_cx_1加载)"):::pink
        current_2("current: None"):::purple
        idle_task_cx_2("idle_task_cx: 原registers_1(用户任务挂起状态)"):::green
    end

    subgraph stage_3["阶段3:exit→用户任务退出"]
        direction LR
        registers_3("registers.cx: idle运行状态(从idle_task_cx_1加载)"):::pink
        current_3("current: None"):::purple
        idle_task_cx_3("idle_task_cx: 原idle_task_cx_1(无变化)"):::green
    end

    subgraph TaskManager["TaskManager:就绪队列"]
        t_task("task.cx: 用户任务挂起状态(仅suspend后存在)"):::coral
    end

    %% 流转逻辑(补充关键动作标注)
    init -->|init| stage_1
    stage_1 -->|suspend| stage_2
    stage_1 -->|exit| stage_3

    %% 状态转移细节
    current_1 -->|take_current后add_task,共享task所有权| TaskManager
    registers_1 -->|__switch保存用户任务状态到task.cx| t_task
    idle_task_cx_1 -->|__switch加载idle状态到寄存器| registers_2
    idle_task_cx_1 -->|__switch加载idle状态到寄存器| registers_3

    %% 样式定义(沿用你的设计)
    classDef pink fill:#FFCCCC,stroke:#333, color: #fff, font-weight:bold;
    classDef green fill: #696,color: #fff,font-weight: bold;
    classDef purple fill:#969,stroke:#333, font-weight: bold;
    classDef error fill:#bbf,stroke:#f66,stroke-width:2px,color:#fff,stroke-dasharray: 5 5;
    classDef coral fill:#f9f,stroke:#333,stroke-width:4px;
    classDef animate stroke-dasharray: 9,5,stroke-dashoffset: 900,animation: dash 25s linear infinite;
与进程有关的重要系统调用
重要系统调用
fork 系统调用
1 | /// 功能:由当前进程 fork 出一个子进程。 |
exec 系统调用
关于
exec指令的详细说明,请参考 exec
1 | /// 功能:将当前进程的地址空间清空并加载一个特定的可执行文件,返回用户态后开始它的执行。 |
利用 fork 和 exec
的组合,我们能让创建一个子进程,并令其执行特定的可执行文件。
waitpid 系统调用
1 | /// 功能:当前进程等待一个子进程变为僵尸进程,回收其全部资源并收集其返回值。 |
sys_waitpid 在用户库中被封装成两个不同的 API,
wait(exit_code: &mut i32) 和
waitpid(pid: usize, exit_code: &mut i32),
前者用于等待任意一个子进程,后者用于等待特定子进程。它们实现的策略是如果子进程还未结束,就以
yield 让出时间片:
1 | // user/src/lib.rs |
应用程序示例
initproc 和 user_shell
两个程序,他们分别是内核的初始进程以及初始进程启动的一个
shell 进程:
initproc是pid == 0的进程,它负责处理内核中的zombie和orphan进程;user_shell从命令行读取命令,并启动一个子进程执行该命令。
用户初始程序-initproc
在内核初始化完毕后创建的第一个进程,是 用户初始进程
(Initial Process) ,它将通过 fork+exec 创建
user_shell 子进程,并将被用于回收僵尸进程。
下面的程序有几个指的注意的点:
pid == -1表示 要等待的子进程不存在(符合 rCore 定义):比如fork()后父进程先执行,子进程还未完成创建(此时父进程无有效子进程),或后续无任何子进程时,wait会返回-1;wait()的阻塞性由 OS 实现决定:代码中父进程在pid == -1时主动调用yield_(),说明 rCore 的sys_waitpid是 非阻塞式 的(无符合条件的僵尸进程时立即返回-1或-2,不挂起父进程),这与 Linux 默认阻塞的waitpid形成差异;- 代码中,显示的处理了
pid == -1以及隐式的处理了pid > 0的所有情况,但是未处理pid == -2的情况:- 对于
pid == -1的子进程,此时子进程尚未创建成功,无需任何处理,我们直接continue继续循环; - 对于
pid > 0(子进程终止,成功回收僵尸进程):会执行println!打印回收日志,之后继续循环; - 未显式处理
pid == -2(子进程存在但均未结束):会跳过pid == -1分支,直接重新进入循环调用wait(因无yield_(),会高频空转);
- 对于
1 |
|
shell程序-user_shell
user_shell 需要捕获用户输入并进行解析处理,为此添加一个能获取用户输入的系统调用:
1 | /// 功能:从文件中读取一段内容到缓冲区。 |
实际调用时,我们必须要同时向内核提供缓冲区的起始地址及长度:
1 | // user/src/syscall.rs |
下面是在 initproc 中启动的一个 shell
程序,该程序从命令行输入指令并创建子进程,在子进程中执行输入的指令。
1 |
|
进程管理的核心数据结构
- 基于应用名的应用链接/加载器
- 进程标识符
PidHandle以及内核栈KernelStack - 任务控制块
TaskControlBlock - 任务管理器
TaskManager - 处理器管理结构
Processor
基于应用名的应用链接/加载器
基于应用名的应用链接/加载器 和之前的加载器并无本质区别:
除了老的加载器中生成的指针
_num_app用来解析app数量和函数地址之外;新的加载器会额外的生成一个指针
_app_names,用来解析线上全部的应用名 。两个指针的区别在于:
_num_app会用来解析_num_app + 2个元素,_app_names会用来解析_num_app个元素;_num_app指向的第一个元素为app数量,后面的[ptr + 1, ptr + _num_app + 1]总共_num_app + 1个元素表示的是函数地址;_app_names指向的[0, _num_app - 1]个元素都是应用名;
最终生成的文件格式如下:唯一需要注意的是
.string "ch2b_bad_address" 会自动的在 .string
后面增加 \0 作为结尾,但是这个和 exec 的参数必须以
'\0' 没有关系,可以参考 exec
1 | .global _num_app |
进程标识符和内核栈
进程标识符
涉及进程有关的struct和对象有三个:
PidHandle表示进程时生成的唯一标识符;PidAllocator用于管理pid-- 负责为新创建的进程分配pid,在进程退出时回收pid;PID_ALLOCATOR全局的唯一PidAllocator实例;
flowchart LR

PidHandler("PidHandler")

PidAllocator("PidAllocator")
PID_ALLOCATOR("PID_ALLOCATOR")


PidAllocator --o|延迟加载唯一实例| PID_ALLOCATOR


Kernel("Kernel") -.->|请求分配PID| PID_ALLOCATOR
PID_ALLOCATOR -.->|分配PID| PidHandler

Kernel --> Process("Process")
PidHandler --> Process
内核栈

进程控制块
PCB
1 | pub struct TaskControlBlock { |
TCB
1 | pub struct TaskControlBlock { |
实现
对比一下
PCB(虽然名字还是 TaskControlBlock) 和TCB的实现,我们可以总结以下几点:
- 新的
PCB新增了四个base_size,heap_bottom,program_brk的解析请参考 应用进程内存模型
任务管理器
老版本
在老版本的 TaskManager 中,它需要负责的功能很杂:
- 执行任务;
- 调度任务;
- 查询任务元数据;
- 代理当前任务的堆调整操作;
flowchart LR

TaskManager("TaskManager"):::pink

run("执行任务"):::purple
schedule("调度任务"):::purple
meta("查询任务元数据"):::purple
heap("堆调整操作"):::purple

run_first_task("run_first_task"):::green
run_next_task("run_next_task"):::green
find_next_task("find_next_task"):::green
mark_current_suspended("mark_current_suspended"):::green
mark_current_exited("mark_current_exited"):::green
get_current_token("get_current_token"):::green
get_current_trap_cx("get_current_trap_cx"):::green
change_current_program_brk("change_current_program_brk"):::green

TaskManager --> run
run -->|执行首个任务| run_first_task
run -->|执行下一个任务| run_next_task

TaskManager --> schedule
schedule -->|查找下一个待执行任务| find_next_task
schedule -->|标记当前任务挂起| mark_current_suspended
schedule -->|标记当前任务退出| mark_current_exited

TaskManager --> meta
meta -->|获取当前任务分页访问信息| get_current_token
meta -->|获取当前陷阱上下文| get_current_trap_cx

TaskManager --> heap -->|调整当前程序堆指针| change_current_program_brk

classDef pink 1,fill:#FFCCCC,stroke:#333, color: #fff, font-weight:bold;
classDef green fill: #696,color: #fff,font-weight: bold;
classDef purple fill:#969,stroke:#333, font-weight: bold;
classDef error fill:#bbf,stroke:#f66,stroke-width:2px,color:#fff,stroke-dasharray: 5 5
classDef coral fill:#f9f,stroke:#333,stroke-width:4px;
classDef animate stroke-dasharray: 9,5,stroke-dashoffset: 900,animation: dash 25s linear infinite;
1 | pub struct TaskManager { |
新版本
在新的版本中,我们将它拆分为了 TaskManager 和
Processor 两个独立的结构:
TaskManager负责管理所有TaskStatus::Ready的结构,只包含了两个方法:add添加一个TaskStatus::Ready的 Task;fetch使用先进先出的顺序,获取一个可执行的 Task;
Processor只负责Task的执行:- 内部包含两个变量:
current包含了当前执行的Task的TCB,这里值得注意的是,TCB对象被包在Arc中,可能为None;idle_task_cx用于中转逻辑;
- 内部提供了三个方法:
get_idle_task_cx_ptr返回内部持有的 TaskContexttake_currentmoveTCB,在suspend和exit这两个会放弃执行时间片的情况下才调用;current共享TCB,用于查询TCB信息时的调用。
- 内部包含两个变量:
flowchart LR
    subgraph init["初始化阶段:无用户任务"]
        direction LR
        registers_0("registers.cx: idle运行状态"):::pink
        current_0("current: None"):::purple
        idle_task_cx_0("idle_task_cx: zero.ctx(占位)"):::green
    end

    subgraph stage_1["阶段1:fetch_task"]
        direction LR
        registers_1("registers.cx: task.cx(用户任务状态)"):::pink
        current_1("current: Some(task)"):::purple
        idle_task_cx_1("idle_task_cx: 原registers.cx(idle休眠状态)"):::green
    end

    subgraph stage_2["阶段2:suspend"]
        direction LR
        registers_2("registers.cx: idle运行状态(从idle_task_cx_1加载)"):::pink
        current_2("current: None"):::purple
        idle_task_cx_2("idle_task_cx: 原registers_1(用户任务挂起状态)"):::green
    end

    subgraph stage_3["阶段3:exit→用户任务退出"]
        direction LR
        registers_3("registers.cx: idle运行状态(从idle_task_cx_1加载)"):::pink
        current_3("current: None"):::purple
        idle_task_cx_3("idle_task_cx: 原idle_task_cx_1(无变化)"):::green
    end

    subgraph TaskManager["TaskManager:就绪队列"]
        t_task("task.cx: 用户任务挂起状态(仅suspend后存在)"):::coral
    end

    %% 流转逻辑(补充关键动作标注)
    init -->|init| stage_1
    stage_1 -->|suspend| stage_2
    stage_1 -->|exit| stage_3

    %% 状态转移细节
    current_1 -->|take_current后add_task,共享task所有权| TaskManager
    registers_1 -->|__switch保存用户任务状态到task.cx| t_task
    idle_task_cx_1 -->|__switch加载idle状态到寄存器| registers_2
    idle_task_cx_1 -->|__switch加载idle状态到寄存器| registers_3

    %% 样式定义(沿用你的设计)
    classDef pink fill:#FFCCCC,stroke:#333, color: #fff, font-weight:bold;
    classDef green fill: #696,color: #fff,font-weight: bold;
    classDef purple fill:#969,stroke:#333, font-weight: bold;
    classDef error fill:#bbf,stroke:#f66,stroke-width:2px,color:#fff,stroke-dasharray: 5 5;
    classDef coral fill:#f9f,stroke:#333,stroke-width:4px;
    classDef animate stroke-dasharray: 9,5,stroke-dashoffset: 900,animation: dash 25s linear infinite;
整体可以总结为:
- 当由内核态(idle)切换到用户态时,利用
idle_task_cx保存内核上下文,从task.task_cx加载用户上下文;- 当由用户态切换回内核态(idle)时,根据是否需要继续执行,决定是否将
task_cx保存到PCB;
suspend要复用上下文 → 存到PCB;exit不复用 → 存到临时变量丢弃。
假设存在以下状态:
kernel_cx:内核态上下文(如idle_task运行时的上下文,包含合法的ra/sp,不是zero_init);zero_init:仅用于 “临时占位” 的全零值,仅在初始化或任务退出时出现,不会被 CPU 执行;task.cx:用户任务的合法上下文(已初始化,可被 CPU 执行)。
整个的执行流程可以如下描述:
初始化
Processor:current = None(无用户任务);idle_task_cx = zero_init(占位用,无实际执行意义);registers = kernel_cx(CPU 运行idle_task,寄存器是idle的合法内核态上下文);
fetch_task(首次调度用户任务):current = Some(task)(绑定当前用户任务);idle_task_cx = kernel_cx(通过__switch保存之前idle_task的内核态上下文,覆盖初始的zero_init);registers = task.cx(通过__switch加载用户任务上下文,CPU 开始执行用户任务);
分叉场景:
3.1
suspend(挂起当前任务):current = None(take_current_task移动task所有权);idle_task_cx = task.cx(通过__switch保存用户任务的运行状态);registers = kernel_cx(通过__switch加载idle_task的内核态上下文,CPU 切回idle);- 额外:
TaskManager中添加task(task.cx保留用户任务状态,后续可恢复);
3.2
exit(当前任务退出):current = None(take_current_task移动task所有权,后续drop(task)释放 TCB);idle_task_cx = kernel_cx(保持不变,仍为idle_task的内核态上下文);registers = kernel_cx(通过__switch加载idle_task的内核态上下文,CPU 切回idle);- 额外:用
zero_init临时变量接收退出任务的状态(会被丢弃,不影响idle_task_cx和寄存器);
1 | pub struct TaskManager { |
进程管理机制的设计实现
初始进程的创建
关于
elf解析可以参考 elf解析
与老版本一致的逻辑
- 解析
elf并初始化内存模型:.data,.rodata,trampoline,trap_context等; - 初始化必要信息,例如
trap_cx_ppn,内核栈等; - 为用户态
TrapContext赋值;
与老版本不一致的逻辑
- 需要为每个task生成一个唯一的 pid;
- 使用
kstack_alloc()代替了KERNEL_SPACE;具体的逻辑请参考 进程的内存模型;
1 | impl TaskControlBlock { |
进程调度机制
进程的调度主要通过 suspend_current_and_run_next
来实现,该函数在执行时通常会包含如下三个重要状态:
registers是当前执行的 task 的cx;TaskControlBlock#task_cx它的当前状态不重要,因为我们要用他来存储目前registers的状态,这样在下次调度的时候可以加载到当前状态;Processor#idle_task_cx保存了上次从内核态切换到用户态的时候的registers;
当我们执行
__switch(TaskControlBlock#task_cx, Processor#idle_task_cx),实际是将当前状态存储到
TCB,并且恢复到内核态。
具体的内部状态流转可以参考 任务管理器 的说明。
进程的生成机制
fork 系统调用的实现
fork 系统调用的实现存在两个需要注意的地方:
- 修改用户进程的信息:为子进程生成一个接近一模一样的内存空间和布局(包括堆和栈)。需注意:这里未实现
COW(写时复制),所有 MapArea
都重新分配了物理内存;实现逻辑不复杂,直接将原进程的地址空间 MemorySet
复制到新进程即可。其中有两个特殊的 MapArea 需要单独处理:
trampoline:全局共享的物理页,属于 “特殊映射”(固定虚拟地址、仅可执行权限、全进程共享物理页),不会被包含在普通 MapArea 的遍历复制中,因此无法通过 for 循环完成 VA→PA 映射,需额外调用map_trampoline(无需重新分配物理页,仅复用全局共享页完成映射);trap_ctx:完整复制父进程的trap_ctx内容,仅需修改kernel_sp字段(指向子进程新分配的内核栈顶,这个是内核态才会用到的),其余字段保持不变。
- 修改PCB信息:
- 重新分配了
pid; - 重新分配了
kernel_stack,这里是基于我们新实现的KSTACK_ALLOCATOR分配的; - 因为重新分配了
kernel_stack,所以kernel_stack_top也改变了; - 初始化
task_cx,**这里非常重要,因为当该进程初始化完毕被调度的时候,会直接将task_cx作为第一次的上下文;所以它的ra = trap_return,sp = kernel_stack_top* *ra = trap_return:表示子进程首次执行时,会先跳转到trap_return函数(完成内核态→用户态的切换);sp = kernel_stack_top:表示子进程的内核栈指针指向新分配的内核栈顶,这也体现了我们的栈从上往下扩展的特性;
- 隐式的修改
sepc,父进程在执行完fork()之后CPU 会自动将 sepc 设置为 ecall 下一条指令的地址(在riscv中是 sepc = sepc + 4),而我们完整的复制了全部的trap_cx,也就是相当于隐式的修改了sepc,这样才保证子进程在第一次被调度的时候不会陷入死循环。 - 修改父进程和子进程的其他关联信息;
- 重新分配了
MemorySet#from_existed_user
1 | impl MemorySet { |
MapArea#from_another
1 | impl MapArea { |
sys_fork的实现
随后,我们还有一点需要注意的是:sys_fork
进程会存在两个返回值:
- 对于父进程会返回子进程的
pid; - 对于子进程会返回
0。
这里我们的实现逻辑是:
- 对于父进程,我们直接返回
pid; - 对于子进程,我们修改它的
trap_cx中的x10,也就是trap_cx.x[10];
1 | pub fn sys_fork() -> isize { |
exec 系统调用的实现
这里注意,我们前面提到的:
- 如果出错的话(如找不到名字相符的可执行文件)则返回 -1
- 否则不应该返回。
这里在执行不出错的时候,
exec函数会直接用新的应用的内存空间去覆盖老的应用的内存空间。
exec 方法的实现会比 fork
要简单很多,我们需要如下操作:
从
elf中读取新的memory_set;修改
PCB中加载前和加载后发生变化的变量,参考下面的模型图很容易得出:- 发生了变化的包括:
memory_set发生了变化;- 由于新应用中的
.text/.rodata/.data/.bss和原应用的长度变化,所以user_stack_top发生了变化; base_size,heap_bottom,program_brk这几个值初始和user_stack_top一直,所以也需要变化;trap_cx_ppn重新分配了物理页;task_ctx
- 未发生变化的:
parentchildren
可以明显看到,和
fork的最大区别就是,fork完全继承了父进程的memory_set。- 发生了变化的包括:
block-beta
    columns 3
        block
            columns 1
            space:6
            user_stack_top("user_stack_top")
            base_size("base_size")
            heap_bottom("heap_bottom")
            program_brk("program_brk")
            space:5
        end
        block
            columns 1
            space:8
            eUserStack("User Stack End")
            mUserStack("...")
            sUserStack("User Stack Start")
            sGuardPage("Guard Page")
            sbss(".bss")
            sdata(".data")
            srodata(".rodata")
            stext(".text")
        end

    block:group4:1
        columns 1
        trampoline("Trampoline")
        TrapContext("TrapContext")
        space:14
    end

    user_stack_top --> eUserStack
    base_size --> eUserStack
    heap_bottom --> eUserStack
    program_brk --> eUserStack

    style user_stack_top fill:linear-gradient(to top, #fff7e6, #fff3e0),stroke:#ff7a45,stroke-width:3px,color:#d4380d,padding:8px,font-weight:bold,border-radius:4px 4px 0 0
    style base_size fill:linear-gradient(to top, #fff7e6, #fff3e0),stroke:#ff7a45,stroke-width:3px,color:#d4380d,padding:8px,font-weight:bold,border-radius:4px 4px 0 0
    style heap_bottom fill:linear-gradient(to top, #fff7e6, #fff3e0),stroke:#ff7a45,stroke-width:3px,color:#d4380d,padding:8px,font-weight:bold,border-radius:4px 4px 0 0
    style program_brk fill:linear-gradient(to top, #fff7e6, #fff3e0),stroke:#ff7a45,stroke-width:3px,color:#d4380d,padding:8px,font-weight:bold,border-radius:4px 4px 0 0

    style eUserStack fill:linear-gradient(to bottom, #e6f7ff, #f0f8ff),stroke:#1890ff,stroke-width:3px,color:#0047ab,padding:8px,border-radius:0 0 4px 4px
    style mUserStack fill:linear-gradient(to bottom, #e6f7ff, #f0f8ff),stroke:#1890ff,stroke-width:3px,color:#0047ab,padding:8px,border-radius:0 0 4px 4px
    style sUserStack fill:linear-gradient(to bottom, #e6f7ff, #f0f8ff),stroke:#1890ff,stroke-width:3px,color:#0047ab,padding:8px,border-radius:0 0 4px 4px

    style sbss fill:linear-gradient(to bottom, #f0fff4, #f5fffa),stroke:#52c41a,stroke-width:2px,color:#237804,padding:8px
    style sdata fill:linear-gradient(to bottom, #fffbe6, #fffdf2),stroke:#faad14,stroke-width:2px,color:#aa5800,padding:8px
    style srodata fill:linear-gradient(to bottom, #f9f0ff, #fcf1ff),stroke:#722ed1,stroke-width:2px,color:#531dab,padding:8px
    style stext fill:linear-gradient(to bottom, #f5f5f5, #fafafa),stroke:#8c8c8c,stroke-width:2px,color:#333333,padding:8px

    style sGuardPage fill:#f0f0f0,stroke:#666666,stroke-width:2px,stroke-dasharray:5,5,color:#333333,padding:8px,font-weight:bold


    style trampoline fill:#f0f0f0,stroke:#666666,stroke-width:2px,stroke-dasharray:5,5,color:#333333,padding:8px,font-weight:bold
    style TrapContext fill:#e8e8e8,stroke:#555555,stroke-width:2px,stroke-dasharray:5,5,color:#222222,padding:8px,font-weight:bold
1 | impl TaskControlBlock |
系统调用后重新获取 Trap 上下文
1 | // os/src/trap/mod.rs |
在执行 exec 之后,trap_cx
已经失效了,所以执行完之后需要重新获取 trap_cx。
1
2
3
let result = syscall(cx.x[17], [cx.x[10], cx.x[11], cx.x[12]]);
+ // cx is changed during sys_exec, so we have to call it again
+ cx = current_trap_cx();
进程资源回收机制
进程的退出
进程的退出通过 exit_current_and_run_next
函数来执行:
take_current_task()获取当前 Processor 中 current 对象的所有权,以便于PCB能被正常的回收;这里需要注意的是:current是一个Option<Arc<TaskControlBlock>>对象,它可能会被其他的PCB引用。例如,他的父线程的child和他子线程的parent都会有对他的引用;- 修改
PCB的状态 task_status 为TaskStatus::Zombie,设置exit_code;这里设置状态为zombie的目的是,为了让父进程在执行wait的时候能够返回对应的信息。 - 在退出之前,将它内部所有的
child的父进程修改为INITPROC,避免资源泄露; - 清空
children和map_area,其实理论上来说,这里不清空理论上也是可以的。但是存在其他引用一直引用到self导致自身不能被正确回收,从而导致这些引用也无法被回收的风险;
1 | /// Exit the current 'Running' task and run the next task in task list. |
父进程回收子进程资源
父进程对子进程的资源回收,是通过 sys_waitpid
来实现的:
- 查找是否存在目标进程:目标进程与输入参数
pid有关,如果不存在任何目标进程返回-1:pid == -1匹配任意一个进程;pid != -1匹配与pid一致的进程;
- 查找是否存在已经结束(task_status ==
TaskStatus::Zombie)的目标进程,如果不存在则返回
-2:pid == -1匹配任意一个进程;pid != -1匹配与pid一致的进程;
- 找到目标进程,我们开始回收子进程资源:
- 从
children中移除当前子进程; - 保证当前
child只有一个强引用,这个位置的设计很有意思可以参考 children和parent; - 设置
exit_code并写入exit_code_ptr指针指向的位置,这个是在系统调用时给用户态应用返回的; - 函数返回
pid,这个是内核态自己函数调用的返回值。
- 从
1 | /// If there is not a child process whose pid is same as given, return -1. |
QA
user_stack和kernel_stack
user_stack 和 kernel_stack
都是与进程绑定的栈,每一个进程都会有唯一的 user_stack 和
kernel_stack,分别负责他们在用户态和内核态的函数执行时的栈操作,区别在于:
user_stack映射在用户内存空间,而kernel_stack映射在内核内存空间;- 用户程序可以操作
user_stack的指针,但是不能操作kernel_stack的指针; - 当用户通过
trap或exception切换到内核态时,由__alltraps负责将sp切换到指向kernel_stack;当从内核态切换回用户态时,由__restore负责将sp切换到指向user_stack。
| 特性 | user_stack(用户栈) | kernel_stack(内核栈) |
|---|---|---|
| 内存空间 | 用户虚拟地址空间(如 0x0~0x7FFFFFFF) | 内核虚拟地址空间(如 0x80000000~0xFFFFFFFF) |
| 访问权限 | 进程可读写(用户态直接操作 sp) |
进程不可访问(仅内核态可操作) |
| 作用 | 支撑用户态函数调用(如
main/clear_bss) |
支撑内核态逻辑(如 sys_exit/ 异常处理) |
| 生命周期 | 随进程创建而分配,进程退出而释放 | 同进程生命周期(和用户栈绑定) |
| 栈指针控制权 | 用户程序可修改 sp(如
addi sp,sp,-16) |
用户程序无法修改,仅内核通过汇编切换 |
进程的退出
仔细观察我们的
sys_exit函数,我们很多的程序并没有显示的调用该系统调用,那他们会正常的退出吗?
答案是肯定!每个进程都会退出,但是他们是怎么退出的?先说结论:进程的退出,可能是多种情况。例如:显示的调用
eixt,预见未捕获的异常(例如除零异常),发起
SIGKILL
信号。但是如果我们以上操作都没有发生进程会怎么退出呢?答案是:
- 在
_start函数的结尾,我们通过exit(main(argc, v.as_slice()))来获取main函数的返回值并作为进程的退出码; - 但是,如果我们在
main中显示的调用exit(),那么程序将直接结束而不会进入到exit(main(argc, v.as_slice()))这里;
但是这是如何实现的呢?
config.toml
在 config.tml 中,我们定义了编译参数为
-Clink-args=-Tsrc/linker.ld
1 | [build] |
Makefile
在 Makefile
编译文件的过程中,将会使用前面提到的参数来指定链接文件。
1 | binary: |
linker.ld
在 linker.ld 中,我们指定的入口函数为
_start。注意,这里我们将 *(.text.entry)
加入到了 .text,否则我们的程序将无法正常执行。
1 | OUTPUT_ARCH(riscv) |
_start
最后,我们在 lib.rs 下定义了 _start:
1 |
|
这样,我们就将用户态程序的入口通过 _start 引导到了
main 函数,并且在 main 函数不调用
exit() 的情况下,保证程序可以正常的退出。
汇编代码
我们先需要删除 Makefile 中的 --strip-all
来保留 elf 文件中的符号表:
1 | binary: |
随后,使用 riscv64-unknown-elf-objdump 和
rustfilt 对elf文件进行反汇编:
1 | riscv64-unknown-elf-objdump -d ../user/build/elf/ch5b_getpid.elf --disassemble=_start | rustfilt |
我们可以得到实际的 _start 函数如下:
1 | ../user/build/elf/ch5b_getpid.elf: file format elf64-littleriscv |
我们可以看到,exit() 的兜底调用是在这里实现的。
进程状态机
flowchart LR

Ready("Ready"):::green
Running("Running"):::purple
Zombie("Zombie"):::error


Running -->|suspend_current_and_run_next| Ready
Running -->|fork| Ready

Ready -->|run_tasks| Running

Running -->|exit_current_and_run_next| Zombie


    classDef pink fill:#FFCCCC,stroke:#333, color: #fff, font-weight:bold;
    classDef green fill: #696,color: #fff,font-weight: bold;
    classDef purple fill:#969,stroke:#333, font-weight: bold;
    classDef error fill:#bbf,stroke:#f66,stroke-width:2px,color:#fff,stroke-dasharray: 5 5;
    classDef coral fill:#f9f,stroke:#333,stroke-width:4px;
KernelStack
1 | /// Kernel stack for a process(task) |
KernelStack 是进程管理中,用于在Kernel Adress
Space(High)分配用户的应用内核栈的数据结构。
简单来说就是,在一个os中,每个函数的调用都必须有自己的函数栈,不论是在
S 模式还是在 U 模式,而
KernelStack 就是在 S 模式下的函数栈指针。
该指针的生命周期如下描述:
- 进程在初始化时会映射虚拟地址
TRAP_CONTEXT_BASE用于存储TrapContext; - 随后初始化
KernelStack,可能有以下三种情况:INITPROC在初始化时通过TaskControlBlock::new()初始化,并通过TaskManager::add()加入等待调度;- 在系统调用
TaskControlBlock::exec()中通过TrapContext::app_init_context()初始化; - 在系统调用
TaskControlBlock::fork()中复制父进程的TrapContext并修改初始化;
- 三种情况在初始化完成之后的调度略微有一些区别:
INITPORC的是直接将自身加入TASK_MANAGER,等待内核调度;exec()本身是系统调度,在初始化完成之后通过__restore来返回用户态;fork()父进程的状态不变,子进程在fork()完得到子进程的地址空间后通过TaskManager::add()加入TASK_MANAGER等待调度。
- 不管是任何情况,当发生
trap时,内核通过__alltraps加载TrapContext-- 而KernelStack也是 其中的一部分,随后内核态的所有函数调用的sp都是用KernelStack作为指针来操作自己的函数栈。
graph TD
    %% 样式定义:按流程阶段区分,突出逻辑层级
    classDef init fill:#e8f4f8, stroke:#2563eb, rounded:8px, font-weight:600;
    classDef branch fill:#fdf2f8, stroke:#9f7aea, rounded:8px, font-weight:600;
    classDef runtime fill:#e8f5e8, stroke:#2e7d32, rounded:8px, font-weight:600;
    classDef exit fill:#fef2f8, stroke:#f43f5e, rounded:8px, font-weight:600;
    classDef arrow stroke:#64748b, stroke-width:1.2px;

    %% 节点定义:特殊字符用双引号包裹,[]改为()
    A("进程初始化"):::init
    B{"初始化场景"}:::branch
    B1("INITPROC new()"):::branch
    B2("exec() 系统调用"):::branch
    B3("fork() 系统调用"):::branch
    C("分配内核栈,初始化 TrapContext(记录内核栈指针)"):::init
    D{"进程运行"}:::runtime
    D1("Trap 发生:__alltraps 切换到内核栈执行"):::runtime
    D2("进程调度:保存内核栈 sp 到 TrapContext,切换到其他进程"):::runtime
    E("进程退出(exit())"):::exit
    F("释放内核栈占用的物理页,回收 TrapContext 映射"):::exit

    %% 逻辑连接:添加样式,保持原有流程
    A --> B:::arrow
    B --> B1:::arrow
    B --> B2:::arrow
    B --> B3:::arrow
    B1 & B2 & B3 --> C:::arrow
    C --> D:::arrow
    D --> D1:::arrow
    D --> D2:::arrow
    D1 & D2 --> E:::arrow
    E --> F:::arrow
KSTACK_ALLOCATOR
KSTACK_ALLOCATOR 是负责 KernelStack
的分配和回收的模块:这里非常值得注意的是,每一个
KernelStack
会分配固定大小的物理地址空间,而这个空间需要在进程退出的时候销毁,我们通过
RAII 实现:
1 | impl Drop for KernelStack { |
内存对齐
内存对齐的本质是适配 CPU 硬件的访存规则,平衡内存访问效率、硬件兼容性和内存空间利用率,核心作用有三:
内存对齐的根本作用
- 避免 CPU 访问内存时的硬件异常(比如 RISC-V 的对齐故障);
- 最大化内存访问效率(CPU 按 “对齐块” 批量读写,而非拆分操作);
- 保证硬件 / 编译器的兼容性(比如 DMA、结构体布局跨平台一致)。
为什么 CPU 要求内存对齐
现代 CPU 的内存访问不是 “字节级” 的,而是按数据总线宽度 / 缓存行大小(比如 64 位 CPU 总线宽度 8 字节,缓存行 64 字节)批量读取,对齐的核心是适配这种 “批量访存” 规则:
- CPU 访存时,会把内存划分为固定大小的 “对齐块”(比如 8 字节、16 字节);
- 若数据起始地址是对齐块大小的整数倍(比如 8 字节对齐→地址是 8 的倍数),CPU 只需 1 次访存就能读取完整数据;
- 若未对齐,CPU 需要 2 次访存,再拼接数据(甚至直接触发硬件异常)。
| 场景 | 地址 | 对齐状态 | CPU 操作 | 效率 |
|---|---|---|---|---|
| 对齐(8 字节) | 0x1000(8 的倍数) | 是 | 1 次访存:读取 0x1000~0x1007,直接拿到完整的 8 字节数据 | 高 |
| 未对齐 | 0x1001 | 否 | 2 次访存:先读 0x1000~0x1007(取后 7 字节),再读 0x1008~0x100F(取前 1 字节),拼接后得到 8 字节 | 低 |
内核场景的对齐策略
| 数据类型 | 对齐值 | 原因 |
|---|---|---|
| 基础类型(u8/u16/u32/u64) | 自身大小 | 适配 CPU 访存宽度 |
| 指针(*mut T) | 8 字节(64 位) | 64 位 CPU 的地址总线宽度是 8 字节 |
| 普通结构体(FileDescriptor) | 最大成员对齐值 | 平衡效率与空间(比如包含 u64 的结构体 8 字节对齐) |
| 核心结构体(TCB / 页表) | 4KB(页对齐) | 适配物理页分配,简化内存管理,避免跨页访问 |
| DMA 缓冲区 | 64/128 字节 | 适配外设的批量传输规则 |
举个例子,假设存在如下结构体,那么它的对齐逻辑应该是:
data自身是一个数组,他的内部按照二字节对齐;同时data的大小是14字节,会被填充2字节后扩充到16字节;big_number按照8字节对齐;small_number自身按照4字节对齐,但因结构体整体对齐值为8字节,最终会填充4字节让总大小满足 8 的倍数- 整个结构体的大小为
32字节。
1 | struct AlignedStruct { |
对象在物理地址和虚拟地址中的转换
转换的核心其实在于:
当从Vec<&'static mut [u8]>读取数据到对象时:
- 通过vec中包含的数据长度和对象的实际长度对比,判断vec中数据的合法性;
- 通过VA得到 mut 指针,在这一步,CPU的MMU会帮我们做VA到PA的转换;
- 判断内存是否对齐。
当反过来从对象写入到Vec<&'static mut [u8]>时,我们才需要分段式的处理它。
总结就是,由物理内存到虚拟内存不需要分段处理,因为我们使用的虚拟内存是连续的,CPU的MMU会帮我们做这个VA到PA的转换。而虚拟内存到物理内存需要分段处理,因为我们此时要写的物理内存是不连续的。
(tcb_ptr as usize) % align_of::<Self>() == 0这行代码是强制校验 TCB 结构体的起始虚拟地址是否满足「内存对齐要求」,是避免 CPU 访问错误、内存布局错乱的 “保命检查”。
- 每个数据类型(尤其是结构体)都有「最小对齐值」(
align_of::<T>()返回的值),比如:
u8:对齐值 1(任意地址都可);u64/usize(64 位):对齐值 8(地址必须是 8 的倍数);- 你的
TCB结构体(#[repr(C, align(4096))]):对齐值 4096(地址必须是 4KB 页大小的倍数);- CPU 访问内存时,要求数据的起始地址必须是其对齐值的整数倍 —— 这是硬件设计决定的(为了提升访存效率,或避免部分架构直接报错)。
1 | impl TaskControlBlock { |
memory_set中的trampoline和trap_cx
children和parent
在 PCB 中,我们的 children 和
parent 的定义如下:
1 | pub impl TaskControlBlockInner { |
可以看到,我们的 parent 和 children
被分别定义为 Arc 和
Weak。首先,我们需要知道为什么需要这么设计:
- 父进程的
children字段需要引用子进程的 TCB(保证子进程运行时不被销毁); - 子进程的
parent字段需要引用父进程的 TCB(方便子进程查询父进程信息)。
所以,他们之间形成了一个引用依赖的关系,如果双方都用 Arc
来进行引用,那么会发生如下情况:
- 父进程退出,但是由于子进程仍然持有他的引用。在这种情况下,只有等待子进程退出之后才能回收父进程的资源;
- 子进程退出,但是由于父进程仍然持有他的引用。在这种情况下,只有等待父进程退出之后才能回收子进程的资源;
引入弱引用就是为了打破这个循环依赖关系,那问题在于,弱引用是如何在保证PCB的生命周期的呢?
- 一个进程,他对他父进程的引用是弱引用,而对他的子进程是 强引用;
- 当子进程先于父进程退出的时候,父进程正常的回收子进程的资源,这个逻辑很简单;
- 当父进程先于子进程退出的时候,父进程会将自身所有的子进程的父进程设置为
INITPROC,并且将他们添加到INITPROC的子进程列表。这保证了在任意时刻,一个进程不会因为缺少强引用而被错误的回收。
elf解析
- 解析 ELF;
- 映射虚拟内存高256GiB;
- map tramploine;
- map TrapContext;
- 映射虚拟内存低256GiB;
- map elf(包括 .text/.rodata/.data/.bss),这里值得注意的是,我们在映射的过程需要将elf中的数据复制到映射的目标虚拟内存;
- map user stack;
- map program break;
- 返回用户地址集,
user_stack_top,以及入口地址;user_stack_top的作用很多,可以参考 应用进程内存模型 的解析。
1 | impl MemorySet { |
进程的内存模型
KernelStackKERNEL_SPACEUserStack在老版本的代码下,的确存在一个UserStack,但是在实现虚拟内存 之后,UserStack 已经被抽象为一段 MapArea,同时记录了user_stack_top作为sp。
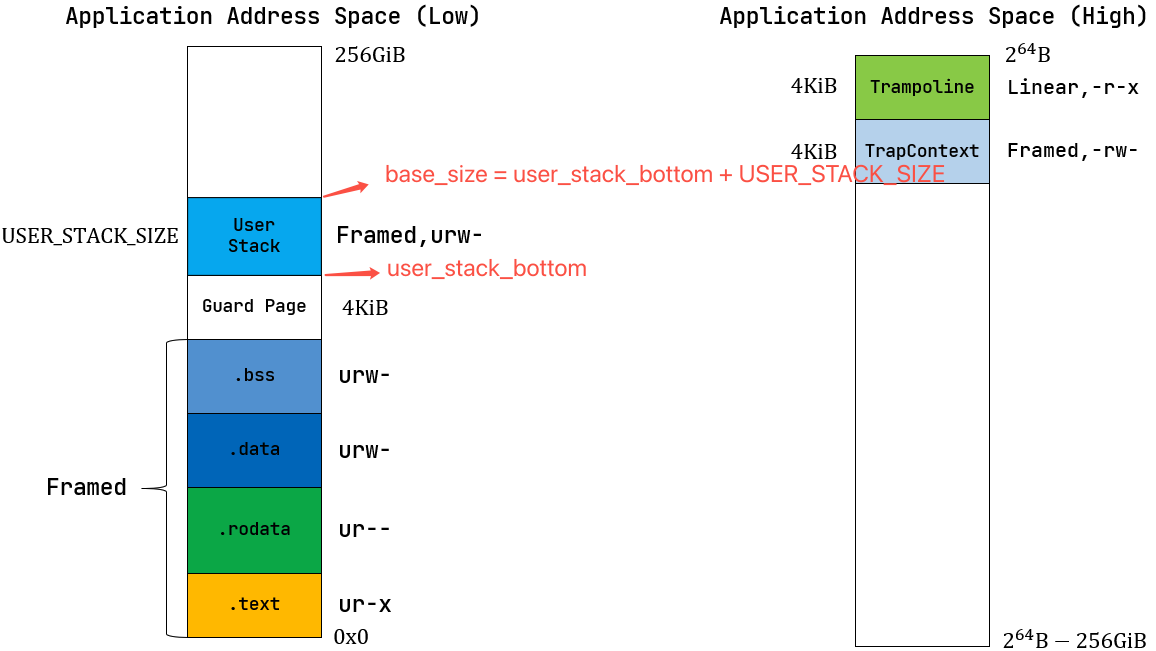
应用进程内存模型
base_size
base_size直接存储 “user_stack高地址边界” 的地址常量,这也是base_size这个名字的来源,他指向user_stack的高地址边界,因为栈是从高地址向低地址增长的。
在操作系统中,user_stack
是用户态程序的虚拟地址的一个指针,指向了用户栈。
用户的虚拟地址中,一般按照 .text -> .rodata -> .data -> .bss -> guard page -> user_stack 的顺序从低到高递增。
假设 user_stack 的地址范围是
[user_stack_bottom, user_stack_bottom + USER_STACK_SIZE),这里
user_stack_bottom + USER_STACK_SIZE 是用户进程的
base_size,那么用户程序的所有数据都只能出现在 base_size
之下。
user_stack_bottom:栈的 低地址边界(栈的起始地址);user_stack_bottom + USER_STACK_SIZE:栈的 高地址边界(也就是base_size);- 栈的增长方向:从高地址向低地址增长(栈顶指针
sp初始指向base_size,每次压栈sp--,出栈sp++)。
heap_bottom
heap_bottom 是用户堆(heap)的
低地址边界(堆从低地址向高地址增长,这个地址是堆的
“起始起点”);初始值和 base_size 完全相同。
program_brk
program_brk
是堆的当前高地址(brk
系统调用可修改,用于扩展 / 收缩堆);
总结
刚初始化时,
base_size/heap_bottom/program_brk都指向 End of User Stack
block-beta
    block:1
        columns 1
        space:2
        eUserStack("End of User Stack")
        sUserStack("Start of User Stack")
        eGuardPage("End of Guard Page")
        sGuardPage("Start of Guard Page")
        ebss("ebss")
        sbss("sbss")
        edata("edata")
        sdata("sdata")
        erodata("erodata")
        srodata("srodata")
        etext("etext")
        stext("stext")
    end

    block
        columns 1
        space:2
        init("user_stack_top/base_size/heap_bottom/program_brk")
    end
    eUserStack --> init

    style eUserStack fill:#e6f7ff,stroke:#1890ff,stroke-width:2px,color:#0047ab,padding:8px
    style sUserStack fill:#e6f7ff,stroke:#1890ff,stroke-width:2px,color:#0047ab,padding:8px
    style eGuardPage fill:#fff2f0,stroke:#ff4d4f,stroke-width:2px,color:#c5001a,padding:8px
    style sGuardPage fill:#fff2f0,stroke:#ff4d4f,stroke-width:2px,color:#c5001a,padding:8px
    style ebss fill:#f0fff4,stroke:#52c41a,stroke-width:2px,color:#237804,padding:8px
    style sbss fill:#f0fff4,stroke:#52c41a,stroke-width:2px,color:#237804,padding:8px
    style edata fill:#fffbe6,stroke:#faad14,stroke-width:2px,color:#aa5800,padding:8px
    style sdata fill:#fffbe6,stroke:#faad14,stroke-width:2px,color:#aa5800,padding:8px
    style erodata fill:#f9f0ff,stroke:#722ed1,stroke-width:2px,color:#531dab,padding:8px
    style srodata fill:#f9f0ff,stroke:#722ed1,stroke-width:2px,color:#531dab,padding:8px
    style etext fill:#f5f5f5,stroke:#8c8c8c,stroke-width:2px,color:#333333,padding:8px
    style stext fill:#f5f5f5,stroke:#8c8c8c,stroke-width:2px,color:#333333,padding:8px
    style init fill:#fff7e6,stroke:#ff7a45,stroke-width:2px,color:#d4380d,padding:8px,font-weight:bold
第一次分配堆,我们需要增加
program_brk,为我们的堆分配空间,此时program_brk和其他两个参数分离了,这里EOUS代表End of User Stack,SOH代表Start Of Heap
block-beta
    block:1
        columns 1
        space:2
        eHeap("End Of Heap")
        eUserStack("EOUS/SOH")
        sUserStack("Start of User Stack")
        eGuardPage("End of Guard Page")
        sGuardPage("Start of Guard Page")
        ebss("ebss")
        sbss("sbss")
        edata("edata")
        sdata("sdata")
        erodata("erodata")
        srodata("srodata")
        etext("etext")
        stext("stext")
    end

    block
        columns 1
        space:2
        program_brk("program_brk")
        init("base_size/heap_bottom")
    end

    eHeap --> program_brk
    eUserStack --> init

    style eUserStack fill:#e6f7ff,stroke:#1890ff,stroke-width:2px,color:#0047ab,padding:8px
    style sUserStack fill:#e6f7ff,stroke:#1890ff,stroke-width:2px,color:#0047ab,padding:8px
    style eGuardPage fill:#fff2f0,stroke:#ff4d4f,stroke-width:2px,color:#c5001a,padding:8px
    style sGuardPage fill:#fff2f0,stroke:#ff4d4f,stroke-width:2px,color:#c5001a,padding:8px
    style ebss fill:#f0fff4,stroke:#52c41a,stroke-width:2px,color:#237804,padding:8px
    style sbss fill:#f0fff4,stroke:#52c41a,stroke-width:2px,color:#237804,padding:8px
    style edata fill:#fffbe6,stroke:#faad14,stroke-width:2px,color:#aa5800,padding:8px
    style sdata fill:#fffbe6,stroke:#faad14,stroke-width:2px,color:#aa5800,padding:8px
    style erodata fill:#f9f0ff,stroke:#722ed1,stroke-width:2px,color:#531dab,padding:8px
    style srodata fill:#f9f0ff,stroke:#722ed1,stroke-width:2px,color:#531dab,padding:8px
    style etext fill:#f5f5f5,stroke:#8c8c8c,stroke-width:2px,color:#333333,padding:8px
    style stext fill:#f5f5f5,stroke:#8c8c8c,stroke-width:2px,color:#333333,padding:8px
    style init fill:#fff7e6,stroke:#ff7a45,stroke-width:2px,color:#d4380d,padding:8px,font-weight:bold
既然
base_size和heap_bottom一直是一样的,为什么我们不直接合并这两个参数呢?因为我们可能在后续的扩展中会分离这两个变量。例如,我们可能希望在Heap和Stack之间插入一个Guard Page。
block-beta
    block:1
        columns 1
        space:2
        eHeap("End Of Heap")
        sHeap("Start Of Heap")
        eGuardPage1("End of Guard Page")
        sGuardPage1("Start of Guard Page")
        eUserStack("End of User Stack")
        sUserStack("Start of User Stack")
        eGuardPage("End of Guard Page")
        sGuardPage("Start of Guard Page")
        ebss("ebss")
        sbss("sbss")
        edata("edata")
        sdata("sdata")
        erodata("erodata")
        srodata("srodata")
        etext("etext")
        stext("stext")
    end

    block
        columns 1
        space:2
        program_brk("program_brk")
        heap_bottom("heap_bottom")
        space:2
        init("base_size")
        space:11
    end

    eHeap --> program_brk
    sHeap --> heap_bottom
    eUserStack --> init

    style eUserStack fill:#e6f7ff,stroke:#1890ff,stroke-width:2px,color:#0047ab,padding:8px
    style sUserStack fill:#e6f7ff,stroke:#1890ff,stroke-width:2px,color:#0047ab,padding:8px
    style eGuardPage fill:#fff2f0,stroke:#ff4d4f,stroke-width:2px,color:#c5001a,padding:8px
    style eGuardPage1 fill:#fff2f0,stroke:#ff4d4f,stroke-width:2px,color:#c5001a,padding:8px
    style sGuardPage fill:#fff2f0,stroke:#ff4d4f,stroke-width:2px,color:#c5001a,padding:8px
    style sGuardPage1 fill:#fff2f0,stroke:#ff4d4f,stroke-width:2px,color:#c5001a,padding:8px
    style ebss fill:#f0fff4,stroke:#52c41a,stroke-width:2px,color:#237804,padding:8px
    style sbss fill:#f0fff4,stroke:#52c41a,stroke-width:2px,color:#237804,padding:8px
    style edata fill:#fffbe6,stroke:#faad14,stroke-width:2px,color:#aa5800,padding:8px
    style sdata fill:#fffbe6,stroke:#faad14,stroke-width:2px,color:#aa5800,padding:8px
    style erodata fill:#f9f0ff,stroke:#722ed1,stroke-width:2px,color:#531dab,padding:8px
    style srodata fill:#f9f0ff,stroke:#722ed1,stroke-width:2px,color:#531dab,padding:8px
    style etext fill:#f5f5f5,stroke:#8c8c8c,stroke-width:2px,color:#333333,padding:8px
    style stext fill:#f5f5f5,stroke:#8c8c8c,stroke-width:2px,color:#333333,padding:8px
    style init fill:#fff7e6,stroke:#ff7a45,stroke-width:2px,color:#d4380d,padding:8px,font-weight:bold
内核堆
关于内核堆的分配可以参考之前的解析:堆的初始化
link_app.S
link_app.S由build.rs生成;- 在
main.rs中由global_asm!(include_str!("link_app.S"));引入后被加载到内核空间中的.text段; MemorySet#new_kernel中,将.text段通过MapType::Identical加载到内核内存空间,此后我们可以使用虚拟地址来访问这个地址了 -- 只不过因为是恒等映射,所以 VA = PA。
exec
寻址逻辑
具体
app_name的生成请参考 基于应用名的应用链接/加载器。
load.rs下的APP_NAMES会加载link_app.S中的全部_app_names- 通过
APP_NAMES可以查找到对应的index; - 通过
index可以在_num_app下找到代码段的start和end; - 通过
start和end直接从.text段读取到数据。
执行逻辑
exec 指令的调用如下:
1 | exec("ch5b_user_shell\0", &[0 as *const u8]); |
输入必须以 '\0' 结尾,这是因为 exec
函数的参数是 &str,Rust 的
&str 类型本身不会在字符串末尾自动添加
\0(null 终止符):
1 | pub fn exec(path: &str, args: &[*const u8]) -> isize { |
而 sys_exec 中,将 path.as_ptr()
转换为一个字符串指针并以该指针作为参数传递给kernel,内核收到数据后,如果没有
'\0' 是无法正确结束循环的。
1 | /// Translate&Copy a ptr[u8] array end with `\0` to a `String` Vec through page table |
进程的资源回收
本描述仅针对于
linux
需要先了解的一点是,linux 下的 waitpid 和
rCore 下的资源回收存在区别:
1 |
|
The wait() system call
suspendsexecution of the calling process until one of its children terminates. The call wait(&status) is equivalent to:
The waitpid() system call suspends execution of the calling process until a child specified by pid argument has changed state. By default, waitpid() waits only for terminated children, but this behavior is modifiable via the options argument, as described below.
- The value of pid can be:
< -1meaning wait for any child process whose process group ID is equal to the absolute value of pid.-1meaning wait for any child process.0meaning wait for any child process whose process group ID is equal to that of the calling process.> 0meaning wait for the child whose process ID is equal to the value of pid.
主要区别有两点:
linux下的 waitpid 是阻塞式的;- 它的返回值除了可能是
pid或者其他状态之外,还有可能是pid_group。
在 os
中,父进程在创建子进程时,内核会为子进程分配一些运行必要的信息 -
pid,TCB(进程控制块)等,父进程必须通过
wait 来查询子进程状态,这是因为
“父进程是否需要子进程的这些信息(如退出码、终止原因)”
这个条件内核是不知道的。对于内核来讲,它需要负责把子进程的状态变化消息交给父进程。
这个过程可能出现几种不同的情况:
- 父进程正常调用
wait/waitpid,拿到退出子进程的状态信息(如退出码),此时内核会彻底回收子进程的pid、TCB(仅保留的关键字段)等资源,子进程正常退出; - 在子进程退出前,父进程未调用
wait就提前退出(因为异常或代码 BUG),此时子进程的状态变为Orphan(孤儿进程),内核维护的initproc进程(PID=1)会负责收养这些孤儿进程,待其终止后回收相关资源 —— 因为父进程已退出,内核明确知道子进程的状态信息无需再交给父进程,可由 init 进程统一回收; - 在子进程退出后,父进程未调用
wait,此时子进程的状态变为Zombie(僵尸进程)。内核仅保留TCB中的关键字段(如 PID、退出码),不会回收这些信息 —— 因为内核无法判断父进程是 “代码中未调用wait” 还是 “已调用但未执行到wait指令”,只能一直保留,直到父进程调用wait(主动回收)或父进程退出(子进程变孤儿,由 init 回收)。
代码统计
1 | ➜ 2025a-rcore-0x822a5b87 git:(ch5) ✗ cloc os |
代码树
本章中主要新增的几个模块为:
fs.rs新增了sys_read;process.rs新增了sys_getpid/fork/exec/waitpid;manager.rs新增任务管理器;pid.rs新增标志符和内核栈的rust抽象;processor.rs新增处理器管理结构Processor
1 | ├── os |