uCore批处理系统
批处理系统
综述
在本章节中,我们实现一个简单的批处理系统,内核在启动之后,将多个程序打包输入并按顺序执行,而本章节我们会实现以下几个重要逻辑:
- 通过加载器在启动时动态的加载代码到并执行;
- 实现错误处理,保证在单个程序出错时不影响其他的程序。这个位置我们会引入一些新的概念,例如
privilege。同时我们也可以看到操作系统和普通的应用程序的区别,例如:操作系统有自己的内核栈,这个栈是完全独立于任何程序的。 - 操作系统通过trap机制来处理
interruption和exception事件。
---
title: Compiling rCore-test
---
flowchart TB

subgraph desc
    direction TB
    build_system("构建系统"):::purple
    dir("文件夹"):::green
    products("源文件/构建产物"):::animate
end


subgraph 构建过程
    direction LR
    makefile("Makefile"):::purple
    build("build.py"):::purple

    target("target/riscv64gc-unknown-none-elf/release"):::green
    build_dir("build"):::green

    source_code("*.rs"):::animate
    bin("*.bin"):::animate
    elf("*.elf"):::animate
    object("*.object"):::animate


    source_code -->|输入| build -->|编译| object -.->|输出到文件夹| target
    object -->|输入| makefile -->|rust-objcopy| bin -.->|输出到文件夹| target
    object -->|输入| makefile -->|cp| elf -.->|输出到文件夹| target

    bin -->|cp| build_dir
    elf -->|cp| build_dir
end

desc --> 构建过程

classDef pink 0,fill:#FFCCCC,stroke:#333, color: #fff, font-weight:bold;
classDef green fill: #695,color: #fff,font-weight: bold;
classDef purple fill:#968,stroke:#333, font-weight: bold;
classDef error fill:#bbf,stroke:#f65,stroke-width:2px,color:#fff,stroke-dasharray: 5 5
classDef coral fill:#f8f,stroke:#333,stroke-width:4px;
classDef animate stroke-dasharray: 8,5,stroke-dashoffset: 900,animation: dash 25s linear infinite;
rCore和rCore-test如何组织代码?
在 rCore-test 这个项目中,构建系统主要包含两个文件分别是 build.py 和 linker.ld。
仔细观察我们会发现一个奇怪的问题:
- build.py 中 通过
cargo rustc --bin %s %s -- -Clink-args=-Ttext=%x这个指令,将build/app下的所有文件编译成了可执行文件。并且以0x80400000作为基址,每个app的大小是0x20000; - 而在 linker.ld 中,我们的 BASE_ADDRESS =
0x0。
要想要解释这个原因,我们首先必须理清项目的编译和执行逻辑。在rCore的开发中,总共可以分为三个不同的模块:
- rCore 的 kernel
- rCore-test的用户态程序,也就是我们的
rCore-Tutorial-Test中src/bin部分; - rCore-Tutorial-Test的用户态程序依赖的库,也就是我们的
rCore-Tutorial-Test中src除了 bin 的部分;
下面我们将简称这三个模块分别为:kernel,
user, lib。
- 编译阶段
lib先被编译为静态库,因其 linker.ld 基址为 0,代码中使用相对跳转访问,不依赖具体加载地址。user程序编译时,通过 cargo rustc 链接 lib,并通过 --link-args=-Ttext=0x80400000 指定最终加载基址,将 lib 的相对地址代码重定位到该基址,生成独立的 ELF 二进制文件(.bin)。
- 执行阶段:
- 内核通过
build.rs将用户程序的 .bin 文件嵌入到内核镜像中(或在运行时读取),确保启动时可访问。 - 内核的 load_app() 函数(如 batch.rs 中)将用户程序二进制数据加载到内存的 0x80400000 及后续地址(与编译时指定的基址一致)。
- 内核通过上下文切换将 CPU 权限切换到用户态,并跳转到用户程序的入口地址(0x80400000 附近的 _start 函数,定义在 lib/src/lib.rs 中),开始执行用户程序。
- 内核通过
观察上面的结论,我们发现,当 kernel 加载 user 的代码时,由于user 程序编译时的基址(0x80400000)必须与内核加载时的目标地址一致,否则会因地址错位导致程序崩溃(例如指令或数据访问到错误内存)。
也就是说,每个app都必须加载在
build.py中使用cargo rustc编译时声明的位置。而此时,user 代码和 kernel 是共用同一片虚拟内存空间的,内核需要提供一些机制防止
user去访问没有权限的内存!这个错误也非常好模拟,只需要修改
batch.rs中APP_BASE_ADDRESS到 0x80200000 即可,这是kernel的代码段,复制会覆盖这段内存导致内核异常。
rCore-test
rCore-test 包含了项目的测试文件,我们前面提到的
“批处理系统将多个程序打包输入并按顺序执行”,那些被打包执行的程序就源自于该仓库中。
整体编译逻辑如下:
- 根据参数BASE,TEST,CHAPTER生成一个包含所有需要编译文件的列表;
- pre 执行会将所有的目标文件复制到
app目录下; - binary 编译源文件:
- 编译源文件得到elf文件放在
$(TARGET_DIR)目录下; - 通过 rust-objcopy 得到二进制文件放在
$(TARGET_DIR)目录下;
- 编译源文件得到elf文件放在
- build 将
.bin和.elf复制到build对应的目录下;
---
title: Compiling rCore-test
---
flowchart TB

subgraph desc
    direction TB
    build_system("构建系统"):::purple
    dir("文件夹"):::green
    products("源文件/构建产物"):::animate
end


subgraph 构建过程
    direction LR
    makefile("Makefile"):::purple
    build("build.py"):::purple

    target("target/riscv64gc-unknown-none-elf/release"):::green
    build_dir("build"):::green

    source_code("*.rs"):::animate
    bin("*.bin"):::animate
    elf("*.elf"):::animate
    object("*.object"):::animate


    source_code -->|输入| build -->|编译| object -.->|输出到文件夹| target
    object -->|输入| makefile -->|rust-objcopy| bin -.->|输出到文件夹| target
    object -->|输入| makefile -->|cp| elf -.->|输出到文件夹| target

    bin -->|cp| build_dir
    elf -->|cp| build_dir
end

desc --> 构建过程

classDef pink 0,fill:#FFCCCC,stroke:#333, color: #fff, font-weight:bold;
classDef green fill: #695,color: #fff,font-weight: bold;
classDef purple fill:#968,stroke:#333, font-weight: bold;
classDef error fill:#bbf,stroke:#f65,stroke-width:2px,color:#fff,stroke-dasharray: 5 5
classDef coral fill:#f8f,stroke:#333,stroke-width:4px;
classDef animate stroke-dasharray: 8,5,stroke-dashoffset: 900,animation: dash 25s linear infinite;
makefile
1 | # define variables |
build.py
build.py 的逻辑比较简单,就是将我们在
make pre 中复制到 build/app 目录下的所有
*.rs 源文件编译到 可执行文件(这也是为什么
bin/*.rs
的每个源文件中都有main函数的原因),以下是一些值得注意的细节:
- 代码的基址是
0x80400000,在rCore-kernel中,我们也必须使用相同的地址来处理这个地址; - 每段代码我们使用了
0x20000这么多空间,理论上来说这个是有问题的,因为每段程序的大小不一样,这有可能导致内存碎片(对于不足0x20000的程序),或者内存溢出等问题(对于超过0x20000的程序)。
1 | import os |
linker.ld
linker.ld 的逻辑和 rCore-kernel
的逻辑基本没有什么区别,就是老生常谈的指定 .text,
.bss, .data
等区域的初始地址,唯一值得注意的是,他这里的基址指定为
0x0,因为这里是需要生成一个静态链接库,具体的他在程序里的偏移量是在链接时由引用他的程序来确定。
1 | OUTPUT_ARCH(riscv) |
rCore-kernel
接下来介绍
kernel的部分。
从main函数入手,我们可以看到相对于第一章初始化完成之后,我们多了三个额外操作:
1 | /// the rust entry-point of os |
---
title: trap and batch
---
flowchart LR

os("OS"):::green --> trap
os --> batch

trap("trap.s") --> trap_desc("注册中断向量表(stvec),处理异常")
batch("batch.s") --> batch_desc("加载test的app到内核空间并执行")

classDef pink 0,fill:#FFCCCC,stroke:#333, color: #fff, font-weight:bold;
classDef green fill: #695,color: #fff,font-weight: bold;
classDef purple fill:#968,stroke:#333, font-weight: bold;
classDef error fill:#bbf,stroke:#f65,stroke-width:2px,color:#fff,stroke-dasharray: 5 5
classDef coral fill:#f8f,stroke:#333,stroke-width:4px;
classDef animate stroke-dasharray: 8,5,stroke-dashoffset: 900,animation: dash 25s linear infinite;
trap
我们可以再回顾一下,一个 trap 触发的流程:
---
title: 跳转
---

flowchart TB


    stvec("stvec"):::pink
    scause("scause"):::pink
    sstatus("sstatus"):::pink
    stval("stval"):::pink


    用户态触发trap("用户态触发trap"):::green
    内核trap处理("内核trap处理"):::error

    stvec -->|1. 读取stvec| 用户态触发trap --> TrapHandler("TrapHandler"):::error

    scause -->|2. 读取trap原因-缺页?系统调用?| 内核trap处理
    sstatus -->|3. 原特权等级-自陷?| 内核trap处理

    stval -->|4. 根据scause解析stval并解析执行| 内核trap处理

    TrapHandler --> scause
    TrapHandler --> sstatus
    TrapHandler --> stval

classDef pink 0, fill:#FFCCCC,stroke:#333, color: #fff, font-weight:bold;
classDef green fill: #695,color: #fff,font-weight: bold;
classDef purple fill:#968,stroke:#333, font-weight: bold;
classDef error fill:#bbf,stroke:#f65,stroke-width:2px,color:#fff,stroke-dasharray: 5 5
classDef coral fill:#f8f,stroke:#333,stroke-width:4px;
classDef animate stroke-dasharray: 8,5,stroke-dashoffset: 900,animation: dash 25s linear infinite;
一次trap的处理,我们需要三个重要寄存器合作:
stvec找到中断向量表;scause找到trap的原因,例如系统调用,缺页异常等;stvaltrap相关的值,不同的scause下,stval有不同的含义。例如,对于缺页异常,stval会保存导致缺页异常的虚拟地址。
trap handler
trap handler
从某种程度来说,就是一个普通的函数,区别是:
- 调用权限与触发方式:普通函数可由任意权限(U/S 态)主动调用(如 call 指令);而 trap handler 是「被动触发」的 —— 只有 CPU 检测到 trap(ecall、缺页、中断等)时,才会自动从 U 态切到 S 态,跳转到 stvec 指向的入口,U 态程序无法主动「调用」它(本质是 CPU 强制触发的跳转,而非函数调用);
- 入口地址的存储与使用:普通函数的地址是链接时确定的,调用时直接嵌入代码(如 call 0x80201000);而 trap handler 的基址存储在 stvec 寄存器中(内核初始化时设置),CPU 触发 trap 时会动态读取 stvec 的值来跳转,而非硬编码地址。
- 统一入口与分发逻辑:所有 trap 共享同一个「入口点」(stvec 指向的起始地址),而非像普通函数那样有各自独立的入口;入口处会先读取 scause 识别 trap 类型,再分发到对应的处理逻辑(如系统调用、缺页异常),这和普通函数「一个函数对应一个功能」的模式完全不同。
值得注意的是: 1. trap handler 由 CPU 触发(硬件行为),内核仅提供实现并提前设置 stvec; 2. 系统调用的本质是「用户态通过 ecall 触发 trap,内核态处理 trap 并提供服务」,核心依赖 trap 机制; 3. CPU 负责「切换特权态、跳转 trap handler」,内核负责「权限检查、 trap 类型分发、业务逻辑处理」。
1 |
|
__alltraps
首先是定义的两个宏用于保存现场,这样我们在trap完成之后可以正常的执行trap之前在执行的代码: 1. 存储寄存器到栈 2. 栈读取到寄存器
1 | # enable alternate macro syntax |
随后,我们的第一个
__alltraps来了,我们再回顾前面的代码会发现,我们注册到
stvec 的是 __alltraps 而不是
trap_handler。
1 | /// initialize CSR `stvec` as the entry of `__alltraps` |
为什么?其实只要细想就能知道,我们还缺少了两个机器关键的步骤:
- 在处理trap的业务逻辑前,我们要保存用户程序的context;
- 在处理trap的业务逻辑后,我们要恢复用户程序的context;
这就是 __alltraps 和 __restore
存在的原因,他们一个为我们保存现场,一个为我们恢复现场。
这里需要注意的点有几个:
sscratch,sepc,sstatus三个寄存器不能直接写入内存,必须通过用户寄存器进行中转;x4(tp)不需要存,应用用不到;x2(sp)
1 | __alltraps: |
接下来 __restore
的逻辑就比较简单了,就是按照先进后出的顺序,恢复上下文。并且释放内核空间的栈,最后退出到用户态;
但是需要注意的,在这里 a0 是 __restore
的第一个参数,也就是 sp,这个 sp
指向的是内核栈中的 TrapContext。
1 | __restore: |
running app
接下来,我们开始解析
rCore是如何将多个程序加载到内核空间,并且在内核空间执行。
build.rs读取user下生成的二进制文件,并生成一个link_app.S文件,文件中包含了全部用户程序等待执行。link_app.S由build.rs生成的汇编文件,会被APP_MANAGER加载并执行;AppManager应用程序管理器,负责管理当前执行的用户程序,例如加载用户程序到内核栈;APP_MANAGER一个AppManager的单线程单核下可变实例,支持exclusive_access;USER_STACK用户栈的地址,目前其实没有真正的用于存储用户数据。只是在__alltraps和__restore中会和sscratch进行交换时会用到。KERNEL_STACK内核栈,目前在__alltraps和__restore中用于存储和还原trap的上下文;syscall系统调用的实现mod,当trap是Exception::UserEnvCall时,trap_handler会通过syscall下面的包来调用系统调用函数。
---
title: 执行程序
---
flowchart TB

subgraph desc
    direction TB
    registers("寄存器"):::pink
    dir("文件夹"):::green
    object("对象"):::purple
    products("源文件/生成文件"):::animate
    t("中断"):::error
    p("用户程序"):::coral
end

subgraph run
    direction TB

    exception_or_interruption("用户中断"):::error

    program("用户程序"):::coral

    build("build.rs"):::animate
    link_app("link_app.S"):::animate
    trap("trap.s"):::animate
    trap_handler("trap_handler"):::animate

    source_bin("user/build/bin"):::green
    APP_MANAGER("APP_MANAGER"):::purple
    USER_STACK("USER_STACK"):::purple
    KERNEL_STACK("KERNEL_STACK"):::purple

    subgraph TrapContext
        user_registers("User-Purpose Registers"):::pink
        sstatus("sstatus"):::pink
        sepc("sepc"):::pink
    end

    source_bin -->|二进制文件| build -->|生成文件| link_app

    link_app -->|汇编文件| APP_MANAGER


    APP_MANAGER -->|1. 加载用户程序到内存| program
    APP_MANAGER -->|2. 初始化context,包含了一个sepc指向用户程序的地址| TrapContext
    APP_MANAGER -->|3. 将context压入内核栈| KERNEL_STACK
    APP_MANAGER -->|4. 调用__restore,会将context中的sepc写入到寄存器| trap

    KERNEL_STACK -->|从内核栈读取并设置寄存器| trap

    program -.->|执行时可能触发中断| trap --> exception_or_interruption -->|如果触发中断,则进行中断处理| trap_handler
end

desc --> run


classDef pink 0,fill:#FFCCCC,stroke:#333, color: #fff, font-weight:bold;
classDef green fill: #695,color: #fff,font-weight: bold;
classDef purple fill:#968,stroke:#333, font-weight: bold;
classDef error fill:#bbf,stroke:#f65,stroke-width:2px,color:#fff,stroke-dasharray: 5 5
classDef coral fill:#f8f,stroke:#333,stroke-width:4px;
classDef animate stroke-dasharray: 8,5,stroke-dashoffset: 900,animation: dash 25s linear infinite;


linkStyle 3,4,5,6,7 color:red;
build.rs
build.rs 的逻辑非常简单,就是读取
user/build/bin
下的所有二进制文件,最后生成一个可执行的汇编程序到
link_app.S 下。
具体 user/build/bin 目录下的内容是从哪里来的,可以参考
rCore和rCore-test如何组织代码?。
link_app.S
link_app.S 的生成逻辑非常简单,就是两个部分:
- 一个数组,数组包含了所有用户程序的开始地址,以及最后一个用户程序的结束地址;所以数组的长度是
n+1,具体原因在源码的注释中有解释; - 通过
incbin将二进制文件引入,并且程序地址和数组前面的代码一一对应。
1 | .align 3 |
APP_MANAGER
APP_MANAGER 是一个 AppManager
的可变实例,主要负责:
- 从
link_app.S中加载用户程序到内存; - 执行用户程序。
- 在执行完用户程序之后,通过
trap.S恢复上下文并跳转回用户态。
加载用户程序到内存。这里需要注意的是,在汇编中使用了一个很有意思的小技巧: 1. 程序的开始地址和结束地址是通过
link_app.S中的_num_app符号来获取的。 2. 通过_num_app符号,我们可以获取到一个数组,数组的长度是应用数量+1,后面的元素是每个用户程序的开始地址,最后一个元素是最后一个用户程序的结束地址。 3. 除了最后一个用户程序的结束地址之外,其他用户程序的长度都可以通过app_n+1_start - app_n_start来计算得到。 4. 而最后一个用户程序的结束地址,则是通过数组的最后一个元素(也就是最后一个程序的结束地址)减去最后一个程序的开始地址来计算得到。
1 | lazy_static! { |
加载用户程序: -
load_app把应用二进制拷贝到内存(APP_BASE_ADDRESS),并执行fence.i,保证指令抓取能看到刚写入的代码。 - 调用TrapContext::app_init_context(APP_BASE_ADDRESS, USER_STACK.get_sp())创建一个用户上下文(设置 sepc 为应用入口、把用户栈指针放到上下文里等)。 - 用KERNEL_STACK.push_context(...)把这个TrapContext压到内核栈上,然后把该上下文地址传给外部汇编例程__restore。 -__restore(在汇编文件里,通常是restore.S/restore.s/trap.s)会把TrapContext中的寄存器恢复到 CPU(包括把用户 SP 恢复到sp、把sepc/sstatus写入相应 CSR),并执行sret跳回到 S 模式下的用户态,从而开始执行加载到APP_BASE_ADDRESS的程序。
1 | unsafe fn load_app(&self, app_id: usize) { |
执行用户程序:这段代码中,我们最重要的代码是调用
__restore,这个函数定义在trap.S中,他的作用是从内核栈中恢复用户程序的上下文,并且通过sret指令跳转到用户态执行用户程序。
- 初始化
TrapContext,这个上下文中包含了用户程序的入口地址(APP_BASE_ADDRESS)和用户栈的地址(USER_STACK.get_sp());- 将
TrapContext压入内核栈中,准备恢复现场;- 调用
__restore,**此时一定要注意,__retore 的参数a0对应的是内核栈的地址;**- 在
__restore中,会从内核栈中恢复TrapContext,而这个上下文中包含了
- 用户的程序地址(
sepc);- 用户的栈地址(
sp);- 最后通过
sret指令跳转到用户态执行用户程序。
1 | /// run next app |
KERNEL_STACK & USER_STACK
QA
代码树
1 | ── os |
如何处理GIT目录安全检查机制引发的编译异常
这里rCore-code和rCore-test是通过两个独立的 git clone引入的,部分情况下(例如通过docker启动并且通过mount关联宿主机的文件地址)可能会触发git的“目录安全检查” 机制导致编译失败,一般异常会如下所示:
1 | error: failed to run custom build command for `os v0.1.0 (/mnt/os)` |
这个是因为git的目录安全检查机制,可能间接影响目录的文件访问权限(或脚本的执行上下文),导致 build.rs 无法读取 ../user/build/bin/ 等依赖目录的文件(比如文件大小被误判为 0),进而引发计算溢出。
我们把新的项目加入safe.directory即可:
1 | git config --global --add safe.directory /mnt |
不过一般来说,对于这种嵌套依赖的项目,我们使用 submodule
可能是一个更好的选择:
1 | git submodule add https://github.com/LearningOS/rCore-Tutorial-Test.git user |
riscv特权级切换
在现代计算机体系下,如果我们把代码的执行看成一个线性的(不考虑多核CPU和乱序指令等)指令执行,那么我们会发现有一些事件我们没有办法处理,例如:
- 在程序执行的过程中计算机找到了一个新的设备,那我必须要等待当前的这些程序全部执行完才能识别到新设备;
- 计算机在访问内存的过程中,发现页表中的缓存已经失效,或者发生了缺页异常;
- 我在某个线程中设置了一个定时器,此时定时器设定的时间到了,我需要去执行定时器的回调函数;
- 用户需要跳转到更高级的特权等级以便于执行某些需要更高权限的操作:例如处于用户态时的系统调用。
这些事件都是不可预测的,而为了处理这些事件,我们需要有一个方式来通知计算机,也就是
trap,而我们根据这些事件的类型,我们将他分为了两个大分类:interruption
和 exception。
flowchart LR

subgraph program
    instruction1("指令1"):::green --> instruction2("指令2"):::green --> instruction3("指令3"):::green -.-> instruction4("..."):::green
end

subgraph 处理
    instruction3 --> handler("处理异常/中断"):::pink --> instruction4
end

exception("exception or interruption"):::error -.->|通知程序有新的事件需要处理| instruction3

classDef pink 0,fill:#FFCCCC,stroke:#333, color: #fff, font-weight:bold;
classDef green fill: #695,color: #fff,font-weight: bold;
classDef purple fill:#968,stroke:#333, font-weight: bold;
classDef error fill:#bbf,stroke:#f65,stroke-width:2px,color:#fff,stroke-dasharray: 5 5
classDef coral fill:#f8f,stroke:#333,stroke-width:4px;
classDef animate stroke-dasharray: 8,5,stroke-dashoffset: 900,animation: dash 25s linear infinite;
异常处理相关的寄存器
- Trap触发与入口配置
stvecSupervisor Trap Vector Base Address RegisterscauseSupervisor Cause RegistersepcSupervisor Exception Program CountersstatusSupervisor Status Register
- 数据传递与地址记录 CSR
stvalSupervisor Trap ValuesscratchSupervisor Scratch
- 中断控制相关 CSR(扩展必备)
sieSupervisor Interrupt Enable RegistersipSupervisor Interrupt Pending Register
异常处理
这里我们先不关注中断相关的CSR,因为本章节主要是关注特权优先级的转换。
| CSR | 功能 |
|---|---|
| stvec | 控制 trap 处理代码的入口地址 |
| scause | 描述 trap 的原因 |
| sepc | 当 trap 是第一个异常的时候,记录 trap 发生之前的 pc |
| sstatus | SPP 等字段给出 Trap 发生之前 CPU 处在哪个特权级(S/U)等信息 |
| stval | Trap 值寄存器:保存与 Trap 相关的补充数据(因 Trap 类型而异) |
| sscratch | S 特权级临时 scratch 寄存器:Trap 触发后,内核可临时存储数据(如内核栈指针 sp),避免覆盖用户态寄存器。 |
在这里,我们先抛开寄存器,考虑一下异常触发时整体的流程:
- 用户态触发trap,通知内核处理trap;
- 内核trap处理,找到trap的对应处理逻辑,并执行该逻辑;
- 内核还原现场到触发trap之前,并将控制权交还给用户态程序;
那他整体的流程相当于是可以看做如下伪代码执行:
work()触发异常,跳转到异常处理逻辑;handle_exception()处理异常;- 跳转回用户态,继续执行
after_handle_exception();
1 | public void run() { |
而在这个程序流转的过程中,我们需要很多信息,例如:
- 触发的是 exception1 还是 exception2?这样我们才能知道使用哪个异常处理函数;
- 异常处理完了,我应该跳回到哪里?work还是after_handle_exception?
当我们把这整个过程扩展开来的时候,我们就可以清楚的了解到,这些寄存器就是连接用户态和内核态的桥梁。
---
title: 一次ecall引发的trap
---
flowchart TB

    subgraph registers
        stvec("stvec"):::pink
        scause("scause"):::pink
        sepc("sepc"):::pink
        sstatus("sstatus"):::pink
        stval("stval"):::pink
        sscratch("sscratch"):::pink
        a0("a0 ~ a7"):::pink
    end

    用户态触发trap("用户态触发trap"):::green
    内核trap处理("内核trap处理"):::error
    返回用户态("返回用户态"):::green


    TrapContext("TrapContext"):::purple

    用户态触发trap -->|保存当前特权级| sstatus
    用户态触发trap -->|保存当前指令地址| sepc
    用户态触发trap -->|设置trap原因| scause
    用户态触发trap -->|设置系统调用参数| a0

    scause -.->|确认trap原因| 内核trap处理
    sepc -.->|记录返回地址| 内核trap处理 -->|记录sepc| TrapContext
    a0 -.->|获取系统调用参数并执行| 内核trap处理

    sepc -->|读取并写入TrapContext| 返回用户态 -->|sepc+4| TrapContext
    sstatus -->|读取并写入TrapContext| 返回用户态 -->|sstatus| TrapContext

    返回用户态 -->|从 sepc 恢复执行,回到用户态| 用户态("用户态")

classDef pink 0,fill:#FFCCCC,stroke:#333, color: #fff, font-weight:bold;
classDef green fill: #695,color: #fff,font-weight: bold;
classDef purple fill:#968,stroke:#333, font-weight: bold;
classDef error fill:#bbf,stroke:#f65,stroke-width:2px,color:#fff,stroke-dasharray: 5 5
classDef coral fill:#f8f,stroke:#333,stroke-width:4px;
classDef animate stroke-dasharray: 8,5,stroke-dashoffset: 900,animation: dash 25s linear infinite;
---
title: 跳转
---
flowchart TB
stvec("stvec"):::pink
scause("scause"):::pink
sstatus("sstatus"):::pink
stval("stval"):::pink
用户态触发trap("用户态触发trap"):::green
内核trap处理("内核trap处理"):::error
stvec -->|1. 读取stvec| 用户态触发trap --> TrapHandler("TrapHandler"):::error
scause -->|2. 读取trap原因-缺页?系统调用?| 内核trap处理
sstatus -->|3. 原特权等级-自陷?| 内核trap处理
stval -->|4. 根据scause解析stval并解析执行| 内核trap处理
TrapHandler --> scause
TrapHandler --> sstatus
TrapHandler --> stval
classDef pink 0, fill:#FFCCCC,stroke:#333, color: #fff, font-weight:bold;
classDef green fill: #695,color: #fff,font-weight: bold;
classDef purple fill:#968,stroke:#333, font-weight: bold;
classDef error fill:#bbf,stroke:#f65,stroke-width:2px,color:#fff,stroke-dasharray: 5 5
classDef coral fill:#f8f,stroke:#333,stroke-width:4px;
classDef animate stroke-dasharray: 8,5,stroke-dashoffset: 900,animation: dash 25s linear infinite;rust是如何组织依赖的
rust中: 1. 每个项目被称之为crate,crate 可以引用其他人发布的crate,由
lib.rs来管理; 2. crate下可能包含模块目录(Module Directory),模块目录由mod.rs来管理; 3. 模块目录下的每个文件一定是一个单独的mod; 4. 文件内部可以声明内嵌mod(Nested Module)。
一个典型的rust项目的结构如下所示:
1 | dev_os/ # 项目根目录 |
rust中lib.rs和mod.rs的区别是什么?
| 特征 | lib.rs | mod.rs |
|---|---|---|
| 核心定位 | 整个 crate 的「库目标入口文件」 | 某个子模块的「目录入口文件」 |
| 适用范围 | 仅用于 src/ 根目录下 | 仅用于「子模块目录」下(如 src/foo/mod.rs) |
| 默认作用 | 自动成为 crate 根模块(crate::) | 自动成为该目录对应的模块(crate::foo::) |
| 关联目标 | 对应 Cargo.toml 中的 [lib] 目标 | 对应某个嵌套子模块(手动通过 mod foo; 引入) |
| 是否必需 | 库目标(library)默认必需(可通过 Cargo.toml 配置修改) | 子模块目录默认必需(否则无法识别该目录为模块) |
例如,在我们的 /user 项目下,它的整体目录结构如下:
1 | ──── user(新增:应用测例保存在 user 目录下) |
我们的 Cargo.toml 定义如下:
1 | [package] |
在这里,我们通过 name="user_lib" 将所有的文件打包为一个
crate。
并且,我们在 lib.rs 中,声明如下:
1 |
|
也就是,只有 console 是 pub 的。
lib.rs
Crate 的「根入口」(库目标专属)
- 仅存于 src/ 根目录:不能放在子目录(如 src/foo/lib.rs 无效),只能在 src/lib.rs;
- 自动关联 crate 根模块:无需任何配置,lib.rs 中的内容直接属于 crate:: 命名空间(比如 lib.rs 中定义 pub fn hello() {},外部可通过 use user_lib::hello; 访问,其中 user_lib 是 crate 名称);
- 控制 crate 对外暴露的内容:lib.rs 中用 pub mod xxx; 导出子模块、#[macro_export] 导出宏、pub use xxx; 重导出内容,外部 crate 只能访问这里公开的内容;
- 可以在 cargo.toml 中配置修改默认的
lib.rs;
mod.rs
子模块目录的「入口文件」:mod.rs 是 Rust 中 嵌套子模块目录 的默认入口文件,核心作用是「定义该目录对应的模块内容、组织该目录下的子文件 / 子目录」。 简单说:当你想把一个目录(如 src/utils/)当作一个模块时,必须在该目录下创建 mod.rs,否则 Rust 无法识别这个目录是一个模块。
- 仅存于「子模块目录」下:必须放在子目录中(如 src/utils/mod.rs),不能在 src/ 根目录下用 mod.rs 替代 lib.rs(无效);
- 自动关联目录模块:src/foo/mod.rs 直接对应模块 crate::foo,该目录下的其他文件(如 foo/bar.rs)需在 mod.rs 中通过 mod bar; 引入;
- 控制子模块的对外暴露:mod.rs 中用 pub mod bar; 导出目录下的子模块,外部只能访问这里公开的内容;
总结
- Rust 以 Crate(包)-> Mod(模块) 为核心层级组织代码 —— 一个 Crate 是最小的编译单元(由 Cargo.toml 的 name 定义),内部通过 mod 拆分逻辑(文件 / 目录对应模块);
- Crate 的库目标(library)默认由 src/lib.rs 管理(根模块 crate::);子模块目录(如 src/foo/)默认由 mod.rs 管理(对应模块 crate::foo::);
- 访问规则:
- 普通成员(fn/struct/enum 等):需满足「双重公开」—— 自身用 pub 修饰(如 pub fn xxx),且所在模块在「根模块到该成员的路径上」都有 pub 暴露(如 lib.rs 中 pub mod foo,foo/mod.rs 中 pub mod bar,才能让外部访问 crate::foo::bar::xxx);
- 宏(macro_rules!):需用 #[macro_export] 标记(替代普通成员的 pub),且所在模块需通过 pub mod 暴露(否则外部无法识别该模块的宏);
- 私有模块 / 成员:仅当前 Crate 内部可访问,外部完全不可见(用于封装内部实现)。
#[macro_use] 和
#[macro_export]
#[macro_use]就是针对于宏的import;#[macro_export]就是针对于宏的export;
fp 的作用是什么?
fp 是 Frame Pointer(帧指针) 的缩写,在 RISC-V
等架构中对应通用寄存器 x8,核心作用是
作为函数调用栈帧的「固定锚点」,定位栈帧内的关键数据(如返回地址、上一层帧指针、局部变量、函数参数)——
配合 sp(栈指针)管理函数调用栈,是栈回溯、调试、函数调用 /
返回的核心依赖。
在函数中,每一个函数都有自己的栈帧(Stack
Frame),栈帧中存储了函数的局部变量、参数、返回地址等信息。而
fp 就是用来指向当前函数的栈帧的起始位置。
每一个函数在调用时,都会创建一个新的栈帧,并且将 fp
指向这个新的栈帧的起始位置。当函数执行完毕后,fp
会被恢复到上一个栈帧的位置。
而一个函数的完整栈帧可以通过如下方式还原:
fp指向当前栈帧的起始位置;fp - 1存储了上一个栈帧的save_ra(返回地址);fp - 2存储了上一个栈帧的save_fp(上一个帧指针);fp - 3开始存储了当前函数的局部变量和参数;- 也就是说,通过
fp - 2可以找到上一个栈帧的fp,从而实现栈帧的回溯。
假设存在一个
a -> b -> c的函数调用链,那么他的栈帧结构如下所示:
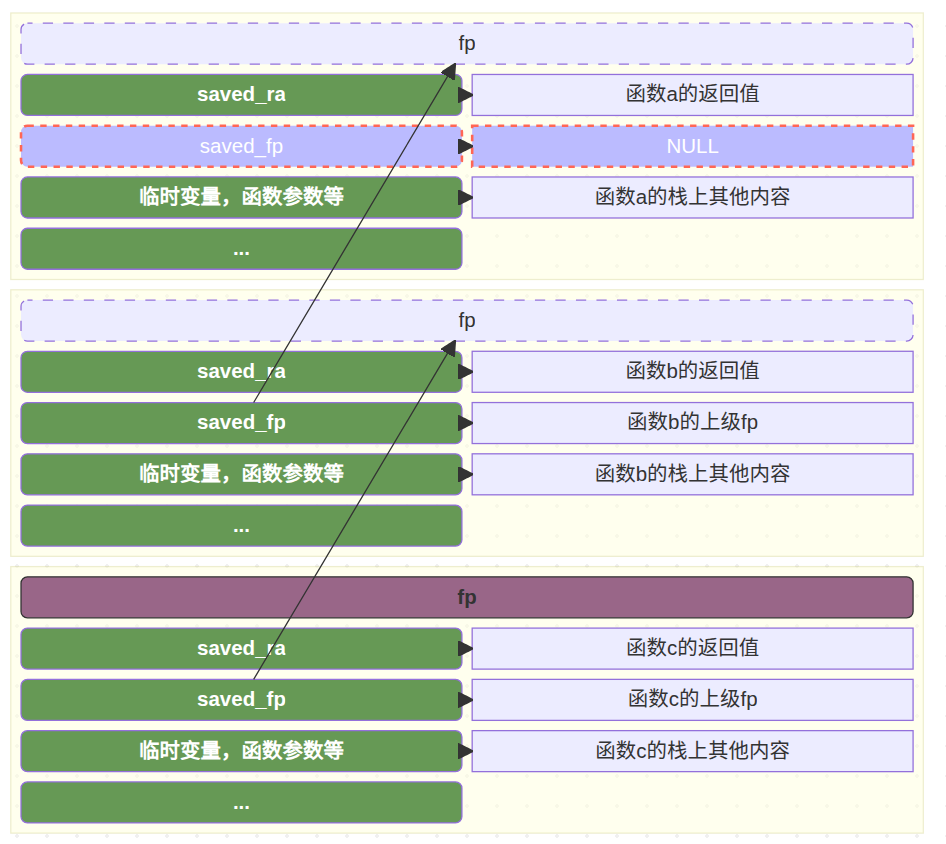
下面是一个打印栈回溯的例子:
1 | use core::{arch::asm, ptr}; |
RISCV中的常见异常
1 |
|
一、核心通用异常(任意特权级可能触发)
| 异常类型 | 类型 | 描述 | 实例 |
|---|---|---|---|
InstructionMisaligned |
指令地址未对齐 | CPU 取指令时,指令地址未满足 RISC-V 要求的对齐规则(默认 4 字节对齐,C 扩展支持 2 字节对齐)。 | 跳转到非 4 字节对齐地址执行指令(如
j 0x80001231);程序计数器 pc
被栈溢出覆盖为非对齐地址。 |
InstructionFault |
指令访问错误 | CPU 取指令时,虚拟地址无法通过 MMU 地址转换(无有效映射),或访问权限不足(如 U 态取内核态指令)。 | U 态程序尝试执行内核态地址(如 0x80000000
以上)的指令;取指令地址为未映射的空指针 0x0。 |
IllegalInstruction |
非法指令 | CPU 解码指令时,发现指令编码无效(非 RISC-V 标准指令),或所需扩展未启用(如未开 F 扩展却执行浮点指令),或特权级不足执行特权指令。 | 执行随机二进制数据(非标准指令编码);U 态执行 M 态特权指令
csrrw;未启用 F 扩展却执行 fadd。 |
Breakpoint |
断点 | 执行 ebreak
断点指令,或调试器设置硬件断点后,程序执行到目标地址触发。 |
代码中插入 ebreak 调试断点;GDB
设置硬件断点后,程序运行到断点地址。 |
LoadFault |
加载故障 | 执行加载指令(lb/lh/lw/ld
等)时,虚拟地址无有效映射,或访问权限不足(如 U
态访问内核态数据)。 |
U 态程序读取内核栈地址数据;加载未映射的无效地址(如
*((int*)0x1234))。 |
StoreMisaligned |
存储地址未对齐 | 执行存储指令(sb/sh/sw/sd
等)时,地址未满足对齐规则(如 sd 需 8
字节对齐、sw 需 4 字节对齐)。 |
用 sd 指令将 8 字节数据写入 0x80001234(非
8 字节对齐);char* p=0x80001231; *(long long*)p=1;。 |
StoreFault |
存储访问错误 | 执行存储指令时,虚拟地址无有效映射,或访问权限不足(如写入只读内存、U 态写入内核态地址)。 | U 态程序写入内核全局变量地址;向 .rodata
只读段写入数据(如 const int a=5; a=6;)。 |
二、系统调用相关异常(主动触发,用于特权级切换)
| 异常类型 | 类型 | 描述 | 实例 |
|---|---|---|---|
UserEnvCall |
用户态系统调用 | U 态程序执行 ecall
指令,主动请求内核提供服务(如文件操作、内存分配)。 |
用户态调用 open/read
系统调用时,编译器生成 ecall 指令触发异常。 |
VirtualSupervisorEnvCall |
虚拟监督态系统调用 | 虚拟化场景中,来宾 OS(Guest)执行 ecall 指令,请求宿主
OS(Host)提供虚拟化服务。 |
来宾 OS 请求宿主分配虚拟内存;Guest 调用需 Host 模拟的硬件相关系统调用。 |
三、页表相关异常(缺页 / 页权限错误,可恢复)
| 异常类型 | 类型 | 描述 | 实例 |
|---|---|---|---|
InstructionPageFault |
指令页故障 | 取指令时,虚拟地址对应页表项(PTE)存在,但 PTE
无效(valid 位 0)或权限不足(如无执行权限)。 |
虚拟地址已分配 PTE 但未分配物理内存(缺页);PTE
execute 位为 0 却执行该页指令。 |
LoadPageFault |
加载页故障 | 加载指令访问时,虚拟地址对应 PTE 存在,但 PTE 无效或权限不足(如无读取权限)。 | 加载地址对应的页被换出到交换分区;PTE valid 位为 0
但虚拟地址已分配。 |
StorePageFault |
存储页故障 | 存储指令访问时,虚拟地址对应 PTE 存在,但 PTE 无效或权限不足(如无写入权限)。 | 写入只读页(PTE w 位为
0);存储地址对应的页未分配物理内存(缺页)。 |
四、虚拟化扩展相关异常(仅支持 V 扩展时生效)
| 异常类型 | 类型 | 描述 | 实例 |
|---|---|---|---|
InstructionGuestPageFault |
来宾指令页故障 | 虚拟化场景中,来宾 OS(Guest)取指令时,触发 Guest 层面的页表故障(PTE 无效/权限不足)。 | Guest 程序取指令地址的 PTE 未分配物理内存;Guest PTE 权限不允许执行指令。 |
LoadGuestPageFault |
来宾加载页故障 | 虚拟化场景中,来宾 OS(Guest)执行加载指令时,触发 Guest 层面的页表故障。 | Guest 加载地址对应的 PTE 无效;Guest PTE 无读取权限却执行加载操作。 |
VirtualInstruction |
虚拟指令异常 | 虚拟化场景中,来宾 OS(Guest)执行需 Host 模拟的指令(如未授权的特权指令)。 | Guest 尝试修改 mtvec 控制寄存器(Host 未授权);Guest
执行 Host 独占的硬件操作指令。 |
StoreGuestPageFault |
来宾存储页故障 | 虚拟化场景中,来宾 OS(Guest)执行存储指令时,触发 Guest 层面的页表故障。 | Guest 存储地址对应的 PTE 无效;Guest PTE 无写入权限却执行存储操作。 |
五、兜底异常
| 异常类型 | 类型 | 描述 | 实例 |
|---|---|---|---|
Unknown |
未知异常 | mcause/scause
寄存器记录的异常代码未匹配任何标准异常(如扩展异常、寄存器值错误)。 |
遇到 RISC-V 新扩展定义的未适配异常;mcause
寄存器被错误修改为无效值。 |
代码
1 | ➜ ~/code/2025a-rcore-0x822a5b87 git:(ch2) ✗ cloc --include-ext=rs,s,S,asm os |