uCore并发
uCore并发
引言
线程定义
简单地说,线程是进程的组成部分,进程可包含1 –
n个线程,属于同一个进程的线程共享进程的资源, 比如
地址空间、打开的文件等。基本的线程由线程ID、执行状态、当前指令指针
(PC)、寄存器集合和栈组成。
线程是可以被操作系统或用户态调度器独立调度(Scheduling)和分派(Dispatch)的基本单位。进程是线程的资源容器,
线程成为了程序的基本执行实体。
简单地说,线程是进程的组成部分,进程可包含1 –
n个线程,属于同一个进程的线程共享进程的资源, 比如
地址空间、打开的文件等。基本的线程由线程ID、执行状态、当前指令指针
(PC)、寄存器集合和栈组成。
线程是可以被操作系统或用户态调度器独立调度(Scheduling)和分派(Dispatch)的基本单位。进程是线程的资源容器,
线程成为了程序的基本执行实体。
// os/src/fs/pipe.rs

pub struct Pipe {
    readable: bool,
    writable: bool,
    buffer: Arc<Mutex<PipeRingBuffer>>,
}
通过 buffer
字段还可以找到该管道端所在的管道自身。后续我们将为它实现
File Trait ,之后它便可以通过文件描述符来访问。
// os/src/fs/pipe.rs

const RING_BUFFER_SIZE: usize = 32;

#[derive(Copy, Clone, PartialEq)]
enum RingBufferStatus {
    FULL,
    EMPTY,
    NORMAL,
}

pub struct PipeRingBuffer {
    arr: [u8; RING_BUFFER_SIZE],
    head: usize,
    tail: usize,
    status: RingBufferStatus,
    write_end: Option<Weak<Pipe>>,
}
graph BT
%% 核心模块:easy-fs(文件系统核心逻辑)
subgraph easy-fs ["easy-fs(文件系统核心算法)"]
direction BT
subgraph BD ["抽象层:BlockDevice(块设备接口)"]
direction TB
read_block("read_block")
write_block("write_block")
end
subgraph BC ["缓存层:BlockCache(块缓存)"]
direction TB
read("read")
modify("modify")
bc_other("其他缓存操作...")
end
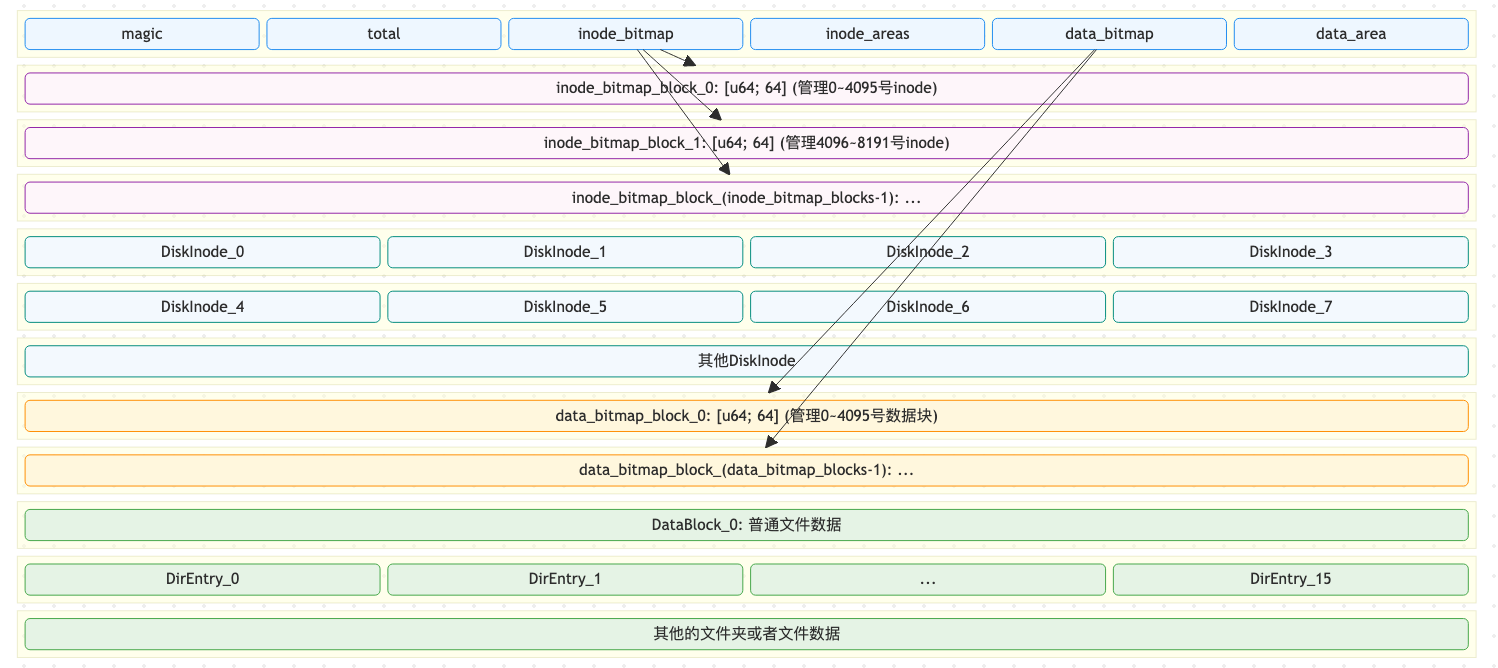
subgraph LAY ["布局层:存储结构定义"]
direction TB
SB("SuperBlock(超级块)")
BM("Bitmap(位图)")
DI("DiskInode(磁盘索引节点)")
DE("DirEntry(目录项)")
DB("DataBlock(数据块)")
end
subgraph BMGR ["管理层:文件系统实例/接口"]
direction TB
EFS("EasyFileSystem(文件系统实例)")
INODE("Inode(文件/目录操作接口)")
end
%% easy-fs 内部链路(修正方向)
BD -->|读写物理块| BC
BC -->|缓存读写| LAY
LAY -->|基于布局实现| BMGR
end
%% 辅助工具:easy-fs 配套工具(宿主机侧)
subgraph easy-fs-tools ["easy-fs-tools(宿主机工具)"]
direction TB
pack("easy_fs_pack(打包工具)")
fuse("easy-fs-fuse(FUSE调试工具)")
end
easy-fs -->|依赖核心逻辑| pack
pack -->|生成镜像| fs_img["fs.img(raw格式镜像)"]
easy-fs -->|适配FUSE接口| fuse
fuse -->|挂载调试| fs_img
%% QEMU(虚拟硬件层)
subgraph qemu ["QEMU(虚拟硬件)"]
direction TB
drive("-drive file=fs.img(后端存储)")
virtio_dev("-device virtio-blk-device(虚拟块设备)")
end
fs_img -->|作为后端存储| drive
drive -->|绑定到虚拟设备| virtio_dev
%% os 内核(驱动+文件系统调用)
subgraph os ["os(内核层)"]
direction TB
subgraph VIRTIO ["驱动层:VirtIOBlock"]
direction TB
virtio_bd("实现 BlockDevice 接口")
virtio_ops("virtio-blk 读写操作")
end
subgraph FS_CALL ["应用层:文件系统调用"]
direction TB
fs_open("open/read/write")
fs_exec("执行ELF文件")
end
end
%% 内核链路
qemu -->|暴露虚拟硬件| virtio_dev
virtio_dev -->|内核枚举设备| VIRTIO
VIRTIO -->|适配接口| easy-fs
easy-fs -->|提供文件操作| FS_CALL
我们将开发一个用户 终端 (Terminal) 或 命令行 (Command Line Application, 俗称 Shell ) , 形成用户与操作系统进行交互的命令行界面 (Command Line Interface)。
为此,我们要对任务建立新的抽象: 进程 ,并实现若干基于 进程 的强大系统调用。
flowchart LR
    subgraph init["初始化阶段:无用户任务"]
        direction LR
        registers_0("registers.cx: idle运行状态"):::pink
        current_0("current: None"):::purple
        idle_task_cx_0("idle_task_cx: zero.ctx(占位)"):::green
    end

    subgraph stage_1["阶段1:fetch_task"]
        direction LR
        registers_1("registers.cx: task.cx(用户任务状态)"):::pink
        current_1("current: Some(task)"):::purple
        idle_task_cx_1("idle_task_cx: 原registers.cx(idle休眠状态)"):::green
    end

    subgraph stage_2["阶段2:suspend"]
        direction LR
        registers_2("registers.cx: idle运行状态(从idle_task_cx_1加载)"):::pink
        current_2("current: None"):::purple
        idle_task_cx_2("idle_task_cx: 原registers_1(用户任务挂起状态)"):::green
    end

    subgraph stage_3["阶段3:exit→用户任务退出"]
        direction LR
        registers_3("registers.cx: idle运行状态(从idle_task_cx_1加载)"):::pink
        current_3("current: None"):::purple
        idle_task_cx_3("idle_task_cx: 原idle_task_cx_1(无变化)"):::green
    end

    subgraph TaskManager["TaskManager:就绪队列"]
        t_task("task.cx: 用户任务挂起状态(仅suspend后存在)"):::coral
    end

    %% 流转逻辑(补充关键动作标注)
    init -->|init| stage_1
    stage_1 -->|suspend| stage_2
    stage_1 -->|exit| stage_3

    %% 状态转移细节
    current_1 -->|take_current后add_task,共享task所有权| TaskManager
    registers_1 -->|__switch保存用户任务状态到task.cx| t_task
    idle_task_cx_1 -->|__switch加载idle状态到寄存器| registers_2
    idle_task_cx_1 -->|__switch加载idle状态到寄存器| registers_3

    %% 样式定义(沿用你的设计)
    classDef pink fill:#FFCCCC,stroke:#333, color: #fff, font-weight:bold;
    classDef green fill: #696,color: #fff,font-weight: bold;
    classDef purple fill:#969,stroke:#333, font-weight: bold;
    classDef error fill:#bbf,stroke:#f66,stroke-width:2px,color:#fff,stroke-dasharray: 5 5;
    classDef coral fill:#f9f,stroke:#333,stroke-width:4px;
    classDef animate stroke-dasharray: 9,5,stroke-dashoffset: 900,animation: dash 25s linear infinite;
在这个章节,我们会实现虚拟内存机制。
虚拟空间连续,物理空间不一定连续!
flowchart LR
    %% 样式定义(避开关键字,用合法语法)
    classDef structStyle fill:#f0f8ff,stroke:#2c3e50,stroke-width:2px,rounded:10px
    classDef vaStyle fill:#fdf2f8,stroke:#9b59b6,stroke-width:2px,rounded:10px
    classDef vpnStyle fill:#fef7fb,stroke:#9b59b6,stroke-width:1px,rounded:8px,padding:10px
    classDef paStyle fill:#e8f4f8,stroke:#3498db,stroke-width:2px,rounded:10px
    classDef ppnStyle fill:#f0f8ff,stroke:#3498db,stroke-width:1px,rounded:8px,padding:10px
    classDef fieldStyle font-weight:bold,color:#2c3e50
    classDef connStyle stroke:#7f8c8d,stroke-width:1.5px,arrowheadStyle:fill:#7f8c8d

    %% 上层:结构体(连续字段)
    subgraph Struct["📦 TimeVal 结构体(连续虚拟内存视图)"]
        direction TB
        sec["sec
usize (8字节)"]:::fieldStyle
        usec["usec
usize (8字节)"]:::fieldStyle
    end
    class Struct structStyle

    %% 中层:虚拟地址 VA(连续,跨2个虚拟页)
    subgraph VA["🌐 虚拟地址 VA(连续)"]
        direction LR
        subgraph VPN0["VPN0(虚拟页0)"]
            %% 修正:sec 位于 VPN0 末尾,VA = 页起始 + (4KB-8) = 0x40200000 + 0xFF8 = 0x40200FF8
            va_sec["0x40200FF8
[页内偏移: 0xFF8 = 4KB-8]"]
        end
        subgraph VPN1["VPN1(虚拟页1)"]
            %% 修正:usec 位于 VPN1 起始,页内偏移 0x000
            va_usec["0x40201000
[页内偏移: 0x000]"]
        end
        note_va["页大小:4KB (0x1000)
VPN0范围:0x40200000~0x40200FFF
VPN1范围:0x40201000~0x40201FFF"]
        class note_va vaStyle
    end
    class VA vaStyle

    %% 下层:物理地址 PA(离散)
    subgraph PA["💾 物理地址 PA(离散)"]
        subgraph PPN0["PPN0(物理页0)"]
            %% 物理页0起始 + 偏移0xFF8 = 0x8000 + 0xFF8 = 0x8FF8
            pa_sec["0x8FF8
[页内偏移: 0xFF8]"]
        end
        subgraph PPN1["PPN1(物理页1)"]
            %% 物理页1起始 + 偏移0x000 = 0x4000 + 0x000 = 0x4000
            pa_usec["0x4000
[页内偏移: 0x000]"]
        end
        note_pa["物理页独立分配,地址不连续
PPN0范围:0x8000~0x8FFF
PPN1范围:0x4000~0x4FFF"]
        class note_pa paStyle
    end
    class PA paStyle

    %% 映射关系(字段 → VA → PA)
    sec -.->|字段对应VA| va_sec:::connStyle
    usec -.->|字段对应VA| VPN1:::connStyle
    va_sec -.->|页表翻译(VPN0→PPN0)| pa_sec:::connStyle
    va_usec -.->|页表翻译(VPN1→PPN1)| pa_usec:::connStyle

    %% 核心结论标注(突出问题)
    conclusion["⚠️  核心问题:
结构体VA连续(跨页边界),但映射的PA离散
内核需拆为2段写入:
1. PPN0的0x8FF8~0x8FFF(6字节?不,8字节刚好)
2. PPN1的0x4000~0x4007"]:::structStyle
    PA -.->|体现| conclusion:::connStyle
flowchart LR
    %% 按类型定义专属样式(遵循通俗约定:函数=蓝、结构体=绿、寄存器=紫、栈=浅红、内存=黄、管理组件=深蓝)
    classDef func fill:#4299e1, stroke:#2563eb, stroke-width:2px, color:#fff, font-weight:bold, rounded:8px, font-size:14px;
    classDef struct fill:#4ade80, stroke:#16a34a, stroke-width:2px, color:#1e293b, font-weight:bold, rounded:8px, font-size:14px;
    classDef reg fill:#a855f7, stroke:#7e22ce, stroke-width:2px, color:#fff, font-weight:bold, rounded:6px, font-size:13px;
    classDef stack fill:#fecaca, stroke:#dc2626, stroke-width:2px, color:#7f1d1d, font-weight:600, rounded:8px, font-size:13px;
    classDef memory fill:#fde047, stroke:#ca8a04, stroke-width:2px, color:#78350f, font-weight:600, rounded:8px, font-size:13px;
    classDef manager fill:#1e40af, stroke:#1e3a8a, stroke-width:2px, color:#fff, font-weight:bold, rounded:10px, font-size:14px;
    classDef transition stroke:#64748b, stroke-width:1.5px, stroke-linecap:round, font-size:12px, font-family:Arial;
    classDef subgraphTitle fill:#1e293b, font-weight:bold, font-size:14px, font-family:Arial;

    %% 栈(USER_STACK/KERNEL_STACK)
    subgraph USER_STACK["USER_STACK"]
        direction LR
        US1("..."):::stack
        US0("UserStack 0"):::stack
    end
    subgraph KERNEL_STACK["KERNEL_STACK"]
        direction LR
        KS1("..."):::stack
        KS0("KernelStack 0"):::stack
    end

    %% 内存/二进制代码
    subgraph Memory["Memory"]
       direction LR
        M1("..."):::memory
        M0("Task 0 Code"):::memory
    end

    %% 任务相关(结构体:TaskControlBlock/TaskStatus/TaskContext/TrapContext)
    subgraph tasks["tasks"]
       subgraph TaskControlBlock1["TaskControlBlock1"]
        TaskContext1("..."):::struct
        TaskStatus1("..."):::struct
       end
       subgraph TaskControlBlock0["TaskControlBlock0"]
        subgraph TaskContext0["TaskContext0"]
            ra0("ra"):::reg
            sp0("sp"):::reg
            s0("s0 ~ s11"):::reg
        end
        TaskStatus0("TaskStatus 0"):::struct
       end
    end
    subgraph TrapContextList["TrapContextList"]
        OtherTrapContext("..."):::struct
        subgraph TrapContext["TrapContext"]
            x0("x0~x31"):::reg
            ssstatus0("sstatus"):::reg
            sepc0("sepc"):::reg
        end
    end

    %% 管理组件(TaskManager/TASK_MANAGER)
    TaskManager("TaskManager"):::manager
    TASK_MANAGER("TASK_MANAGER"):::manager

    %% 函数(main/__restore)
    main("main"):::func
    __restore("__restore"):::func

    %% 原有连接关系(保持不变,统一应用transition样式)
    TaskManager -->|延迟加载全局唯一实例| TASK_MANAGER:::transition
    main -->|1. load_apps 加载应用代码| Memory:::transition
    main -->|2. run_first_task触发初始化| TASK_MANAGER:::transition
    TASK_MANAGER -.->|初始化| tasks:::transition
    sp0 -.->|__restore使用sp作为参数恢复上下文| __restore:::transition
    sepc0 -.-> M0:::transition
    x0 -.->|sp| US0:::transition
    KS0 -.->|存储了TrapContext| TrapContext:::transition
    ra0 --> __restore:::transition
    sp0 --> KS0:::transition

    %% 优化子图标题样式(统一居中、加粗)
    style USER_STACK fill:#fef2f2, stroke:#fecaca, stroke-width:1px, padding:10px;
    style KERNEL_STACK fill:#fef2f2, stroke:#fecaca, stroke-width:1px, padding:10px;
    style Memory fill:#fffbeb, stroke:#fde047, stroke-width:1px, padding:10px;
    style tasks fill:#ecfccb, stroke:#4ade80, stroke-width:1px, padding:10px;
    style TrapContextList fill:#ecfccb, stroke:#4ade80, stroke-width:1px, padding:10px;
在本章节中,我们实现一个简单的批处理系统,内核在启动之后,将多个程序打包输入并按顺序执行,而本章节我们会实现以下几个重要逻辑:
privilege。同时我们也可以看到操作系统和普通的应用程序的区别,例如:操作系统有自己的内核栈,这个栈是完全独立于任何程序的。interruption 和
exception 事件。---
title: Compiling rCore-test
---
flowchart TB
subgraph desc
direction TB
build_system("构建系统"):::purple
dir("文件夹"):::green
products("源文件/构建产物"):::animate
end
subgraph 构建过程
direction LR
makefile("Makefile"):::purple
build("build.py"):::purple
target("target/riscv64gc-unknown-none-elf/release"):::green
build_dir("build"):::green
source_code("*.rs"):::animate
bin("*.bin"):::animate
elf("*.elf"):::animate
object("*.object"):::animate
source_code -->|输入| build -->|编译| object -.->|输出到文件夹| target
object -->|输入| makefile -->|rust-objcopy| bin -.->|输出到文件夹| target
object -->|输入| makefile -->|cp| elf -.->|输出到文件夹| target
bin -->|cp| build_dir
elf -->|cp| build_dir
end
desc --> 构建过程
classDef pink 0,fill:#FFCCCC,stroke:#333, color: #fff, font-weight:bold;
classDef green fill: #695,color: #fff,font-weight: bold;
classDef purple fill:#968,stroke:#333, font-weight: bold;
classDef error fill:#bbf,stroke:#f65,stroke-width:2px,color:#fff,stroke-dasharray: 5 5
classDef coral fill:#f8f,stroke:#333,stroke-width:4px;
classDef animate stroke-dasharray: 8,5,stroke-dashoffset: 900,animation: dash 25s linear infinite;
项目的全部代码在这里:ardi
我们的项目包含以下文件,各模块功能如下:
*.rs 文件:Rust
源代码文件,定义了程序的核心执行逻辑;linker.ld:链接脚本(Linker
Script),用于告知链接器如何合并目标文件、编排内存布局,最终生成符合要求的二进制文件;entry.asm:启动引导文件(汇编编写),负责初始化基础执行环境,引导
CPU 定位并跳转到 Rust 程序的入口地址;rustsbi-qemu.bin :SBI(Supervisor Binary
Interface)固件文件,作为内核与硬件的隔离层 /
抽象层,为内核提供硬件相关的基础服务(详见 什么是
SBI);Makefile :
构建脚本,通过声明编译目标(target)、依赖关系及执行命令,简化程序的编译、运行、加载等流程管理。flowchart LR
rustsbi(rustsbi-qemu.bin):::coral
linker("linker.ld"):::green
entry("entry.asm"):::green
rust("*.rs"):::green
qemu("qemu"):::error
cargo("cargo"):::error
linker --> cargo
entry --> cargo
rust --> cargo
cargo --> elf -->|rust-objcopy| binary
subgraph elf
direction TB
os_comment("elf格式的二进制文件") -.-> os("os"):::pink
end
subgraph binary
direction TB
os_bin_comment("二进制文件") -.-> os_bin("os.bin"):::pink
end
binary --> rustsbi --> qemu
classDef pink 0,fill:#FFCCCC,stroke:#333, color: #fff, font-weight:bold;
classDef green fill: #695,color: #fff,font-weight: bold;
classDef purple fill:#968,stroke:#333, font-weight: bold;
classDef error fill:#bbf,stroke:#f65,stroke-width:2px,color:#fff,stroke-dasharray: 5 5
classDef coral fill:#f8f,stroke:#333,stroke-width:4px;
classDef animate stroke-dasharray: 8,5,stroke-dashoffset: 900,animation: dash 25s linear infinite;
最近在学习 RISCV 的过程中,碰见了一个比较奇特的BUG,在下面的代码中,我们出现了一个神秘的未定义行为(Undefined Behavior):
#include <stdio.h>

void main()
{
    char a;
    unsigned int b;
    unsigned long c;

    a = 0x88;
    b = ~a;
    c = ~a;

    printf("a=0x%x, ~a=0x%x, b=0x%x, c=0x%lx\n", a, ~a, b, c);
}
本来是一段很简单的用于测试C语言下的隐式转换规则的代码,结果很神奇的是在两个不同的平台下出现了截然不同的输出!